Security RX Jira workflows automatically create Jira tickets when vulnerabilities are detected in your applications, and keep those tickets in sync as their status changes in either system.
What you can do
With a Security RX Jira workflow, you can:
- Automatically create tickets when vulnerabilities matching your criteria are detected.
- Route tickets to the right team using entity tags, New Relic team links, or a default fallback.
- Keep tickets in sync with two-way synchronization between Jira and New Relic.
- Configure severity thresholds and SLA days so due dates are set automatically on each ticket.
- Monitor ticket activity from the workflow details page without leaving New Relic.
- Pause and resume workflows at any time without losing configuration.
Prerequisites
Before creating your first workflow, make sure you have:
- A Security RX entitlement — your organization must have an active Security RX (APM) subscription.
- Appropriate user permissions — see Prerequisites and user roles. Creating workflows and managing connections requires an organization manager or product admin role.
- Vulnerability data flowing into New Relic — through an APM agent, Infrastructure agent, or a supported integration.
- A configured Jira connection — an organization admin must set this up before you can create a workflow. See Set up a Jira connection.
Set up a Jira connection
Jira connections are organization-level resources managed by admins. A single connection can be shared across multiple workflows.
Provide the following information when you create a connection:
Field | Description |
|---|---|
Jira instance URL | The URL of your Jira Cloud or Data Center instance. |
Username | A Jira username with permission to create issues. |
API token | A Jira API token with webhook creation permissions. |
You need webhook creation permissions to enable two-way sync — when you update a ticket in Jira, the change syncs back to New Relic.
To create a connection:
- Go to one.newrelic.com > Security RX > Workflows.
- Select Add a Jira connection.
- Enter your Jira instance URL, username, and API token.
- Save the connection. It's now available to all workflow creators in your organization.
Create a workflow
Creating a workflow is a two-step wizard. Step 1 defines what vulnerabilities to track. Step 2 configures where and how tickets are created in Jira.
Step 1: Define security scope
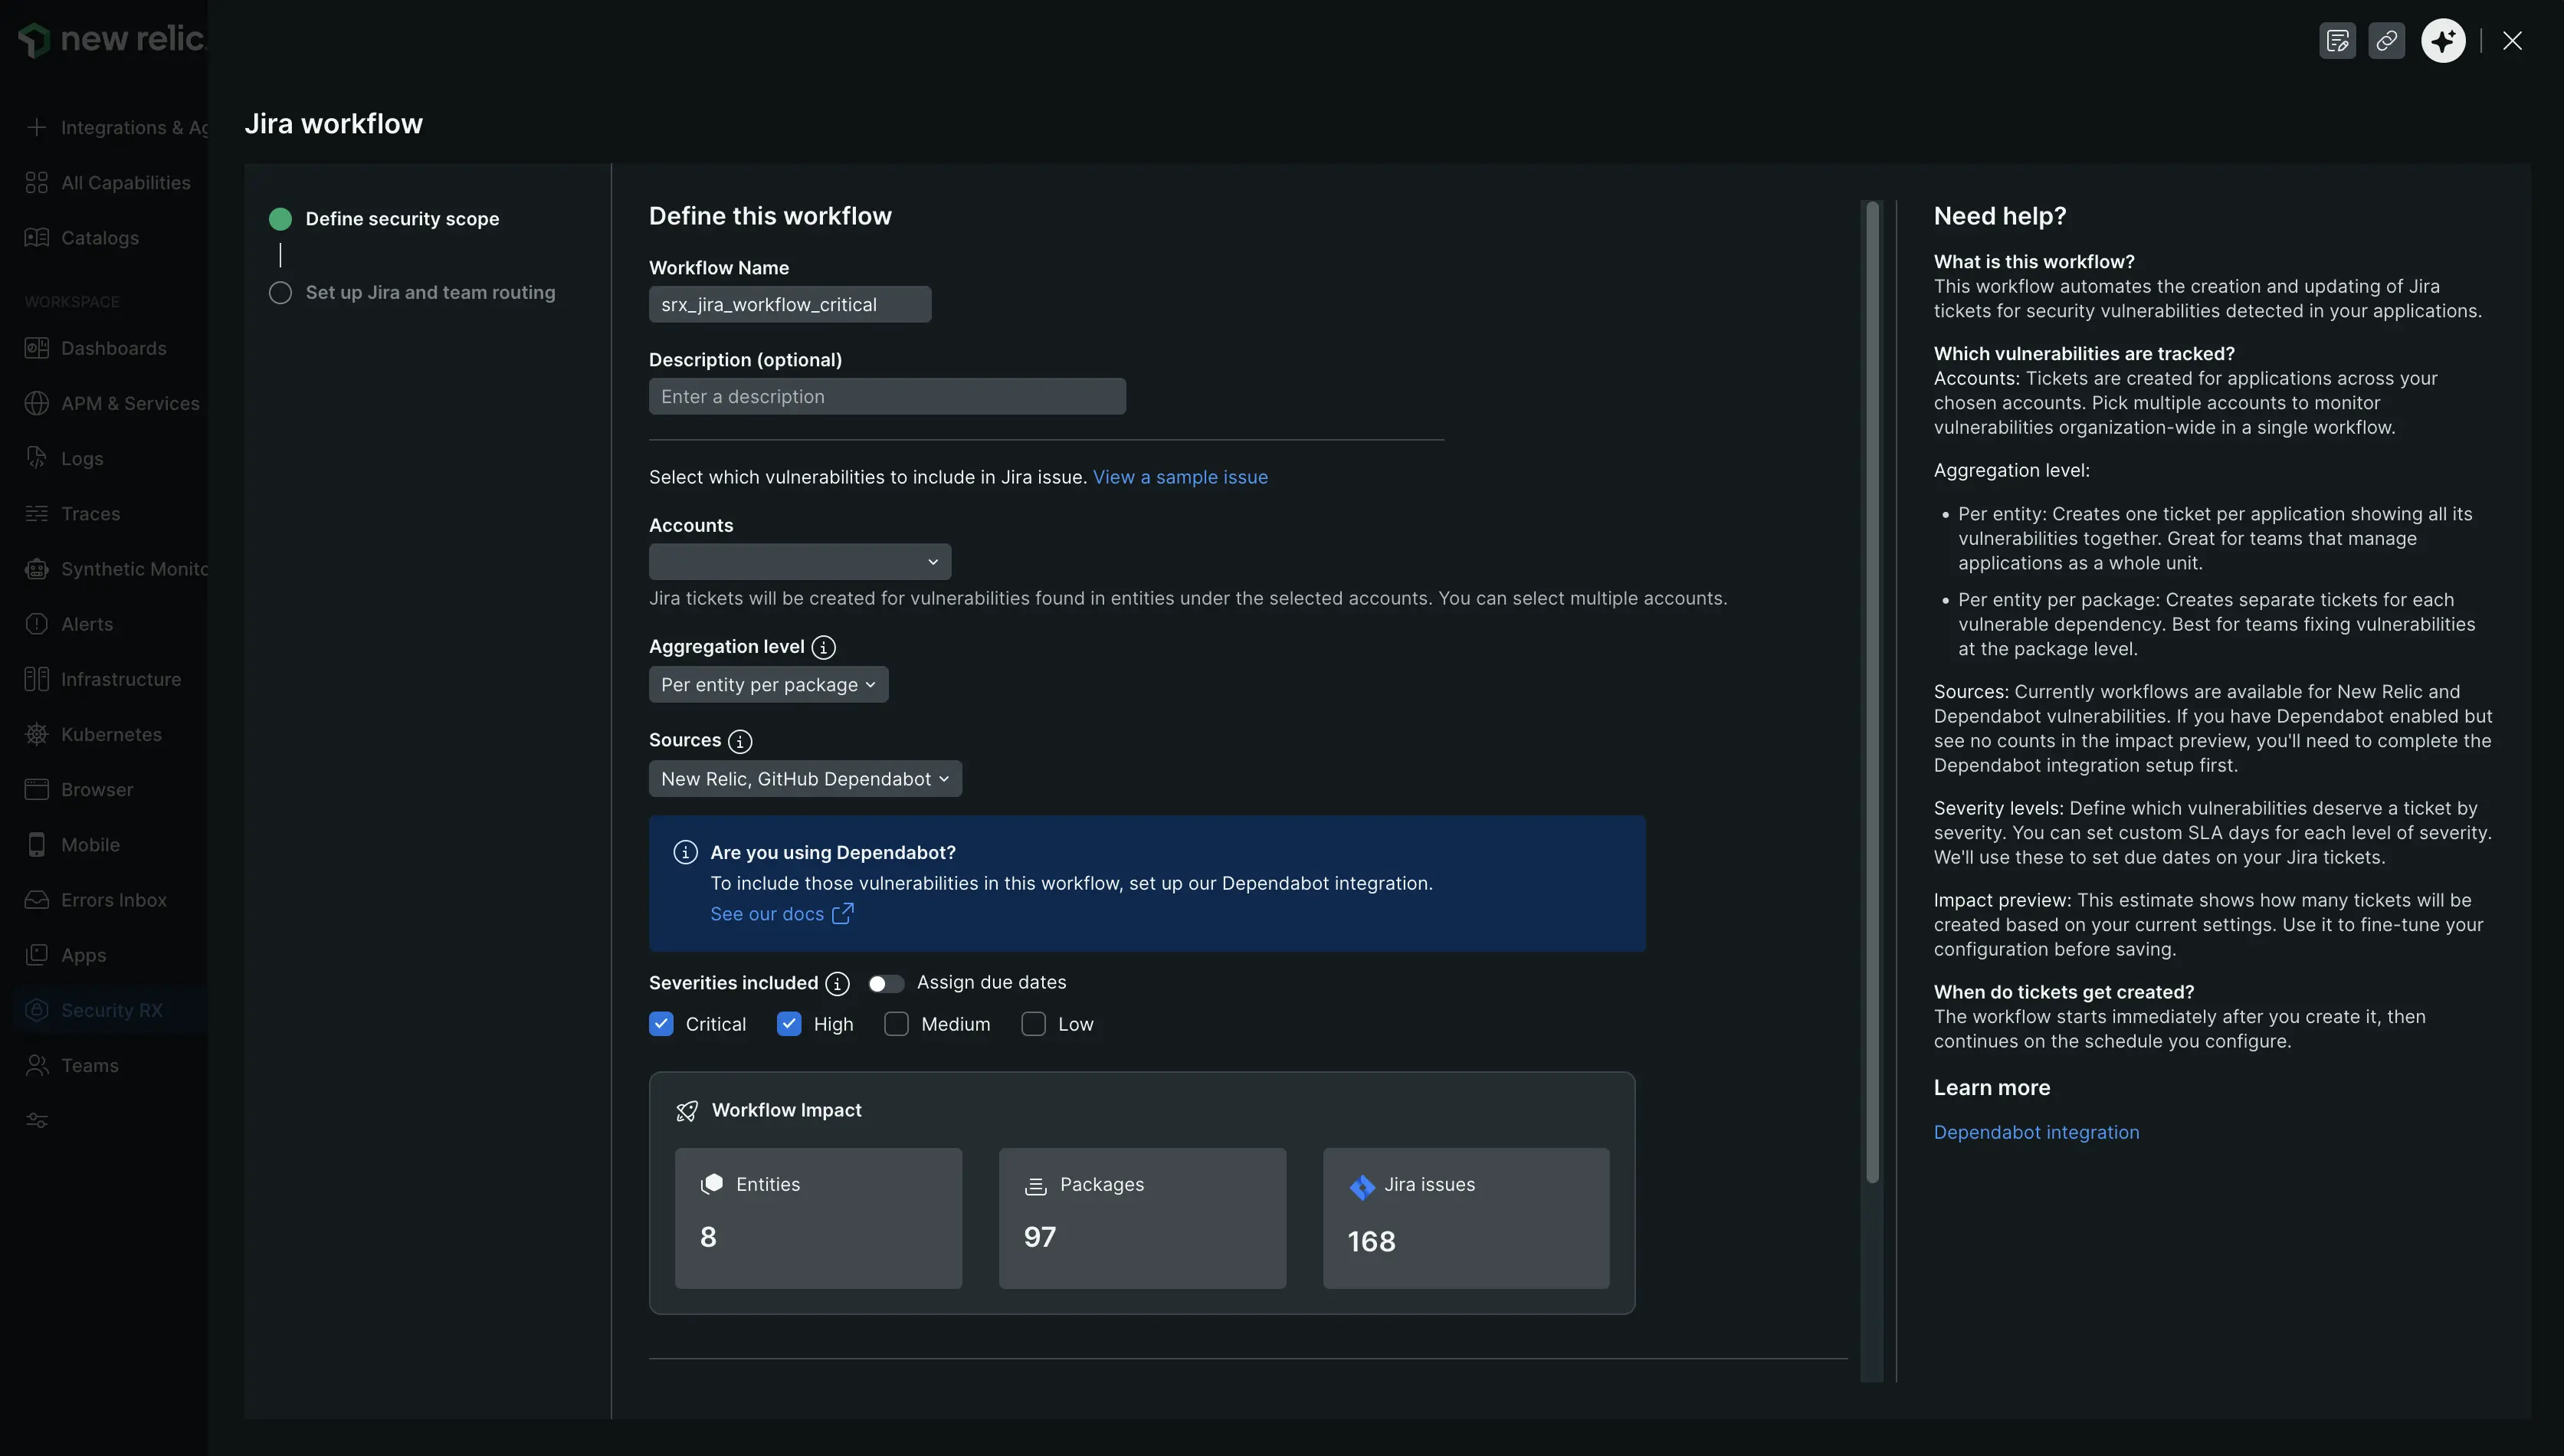
one.newrelic.com > Security RX > Workflows > Add a Jira workflow
Configure the following fields:
Workflow name
A unique identifier for this workflow. Must start with a letter or underscore and may contain letters, numbers, underscores, and hyphens (3–100 characters). No two workflows in the same account can share a name.
Accounts
Select one or more New Relic accounts to monitor. The current account is selected by default. You can monitor up to 100 accounts in a single workflow.
Aggregation level
Controls how vulnerabilities are grouped into tickets:
Option | Description |
|---|---|
Per entity per package | Creates one ticket per vulnerable dependency per application. Best for teams that fix vulnerabilities at the package level. |
Per entity | Creates one ticket per application showing all its vulnerabilities together. Best for teams that manage applications as a whole. |
Vulnerability sources
Select which detection systems to include. At least one source must be selected.
Source | Description |
|---|---|
New Relic | Vulnerabilities detected by New Relic's built-in scanning. |
GitHub Dependabot | Vulnerabilities from GitHub Dependabot alerts. Requires the Dependabot integration to be configured first. |
Severities included
Choose which severity levels generate tickets and set SLA days for each. The SLA value is used to calculate the due date on the Jira ticket. SLA days must be between 1 and 365.
Severity | Default SLA |
|---|---|
Critical | 30 days |
High | 60 days |
Medium | 90 days |
Low | 90 days |
Schedule
How often the workflow runs to check for new vulnerabilities:
Frequency | Interval |
|---|---|
Daily | 1 day |
Weekly | 7 days |
Bi-weekly | 15 days |
Monthly | 30 days |
Bi-monthly | 60 days |
Quarterly | 90 days |
The workflow runs immediately after you create it, then continues on the selected schedule.
Workflow impact
A real-time estimate shows how many entities, packages, and Jira tickets will be affected by your current settings. Use this to fine-tune the configuration before saving.
Step 2: Set up Jira and team routing
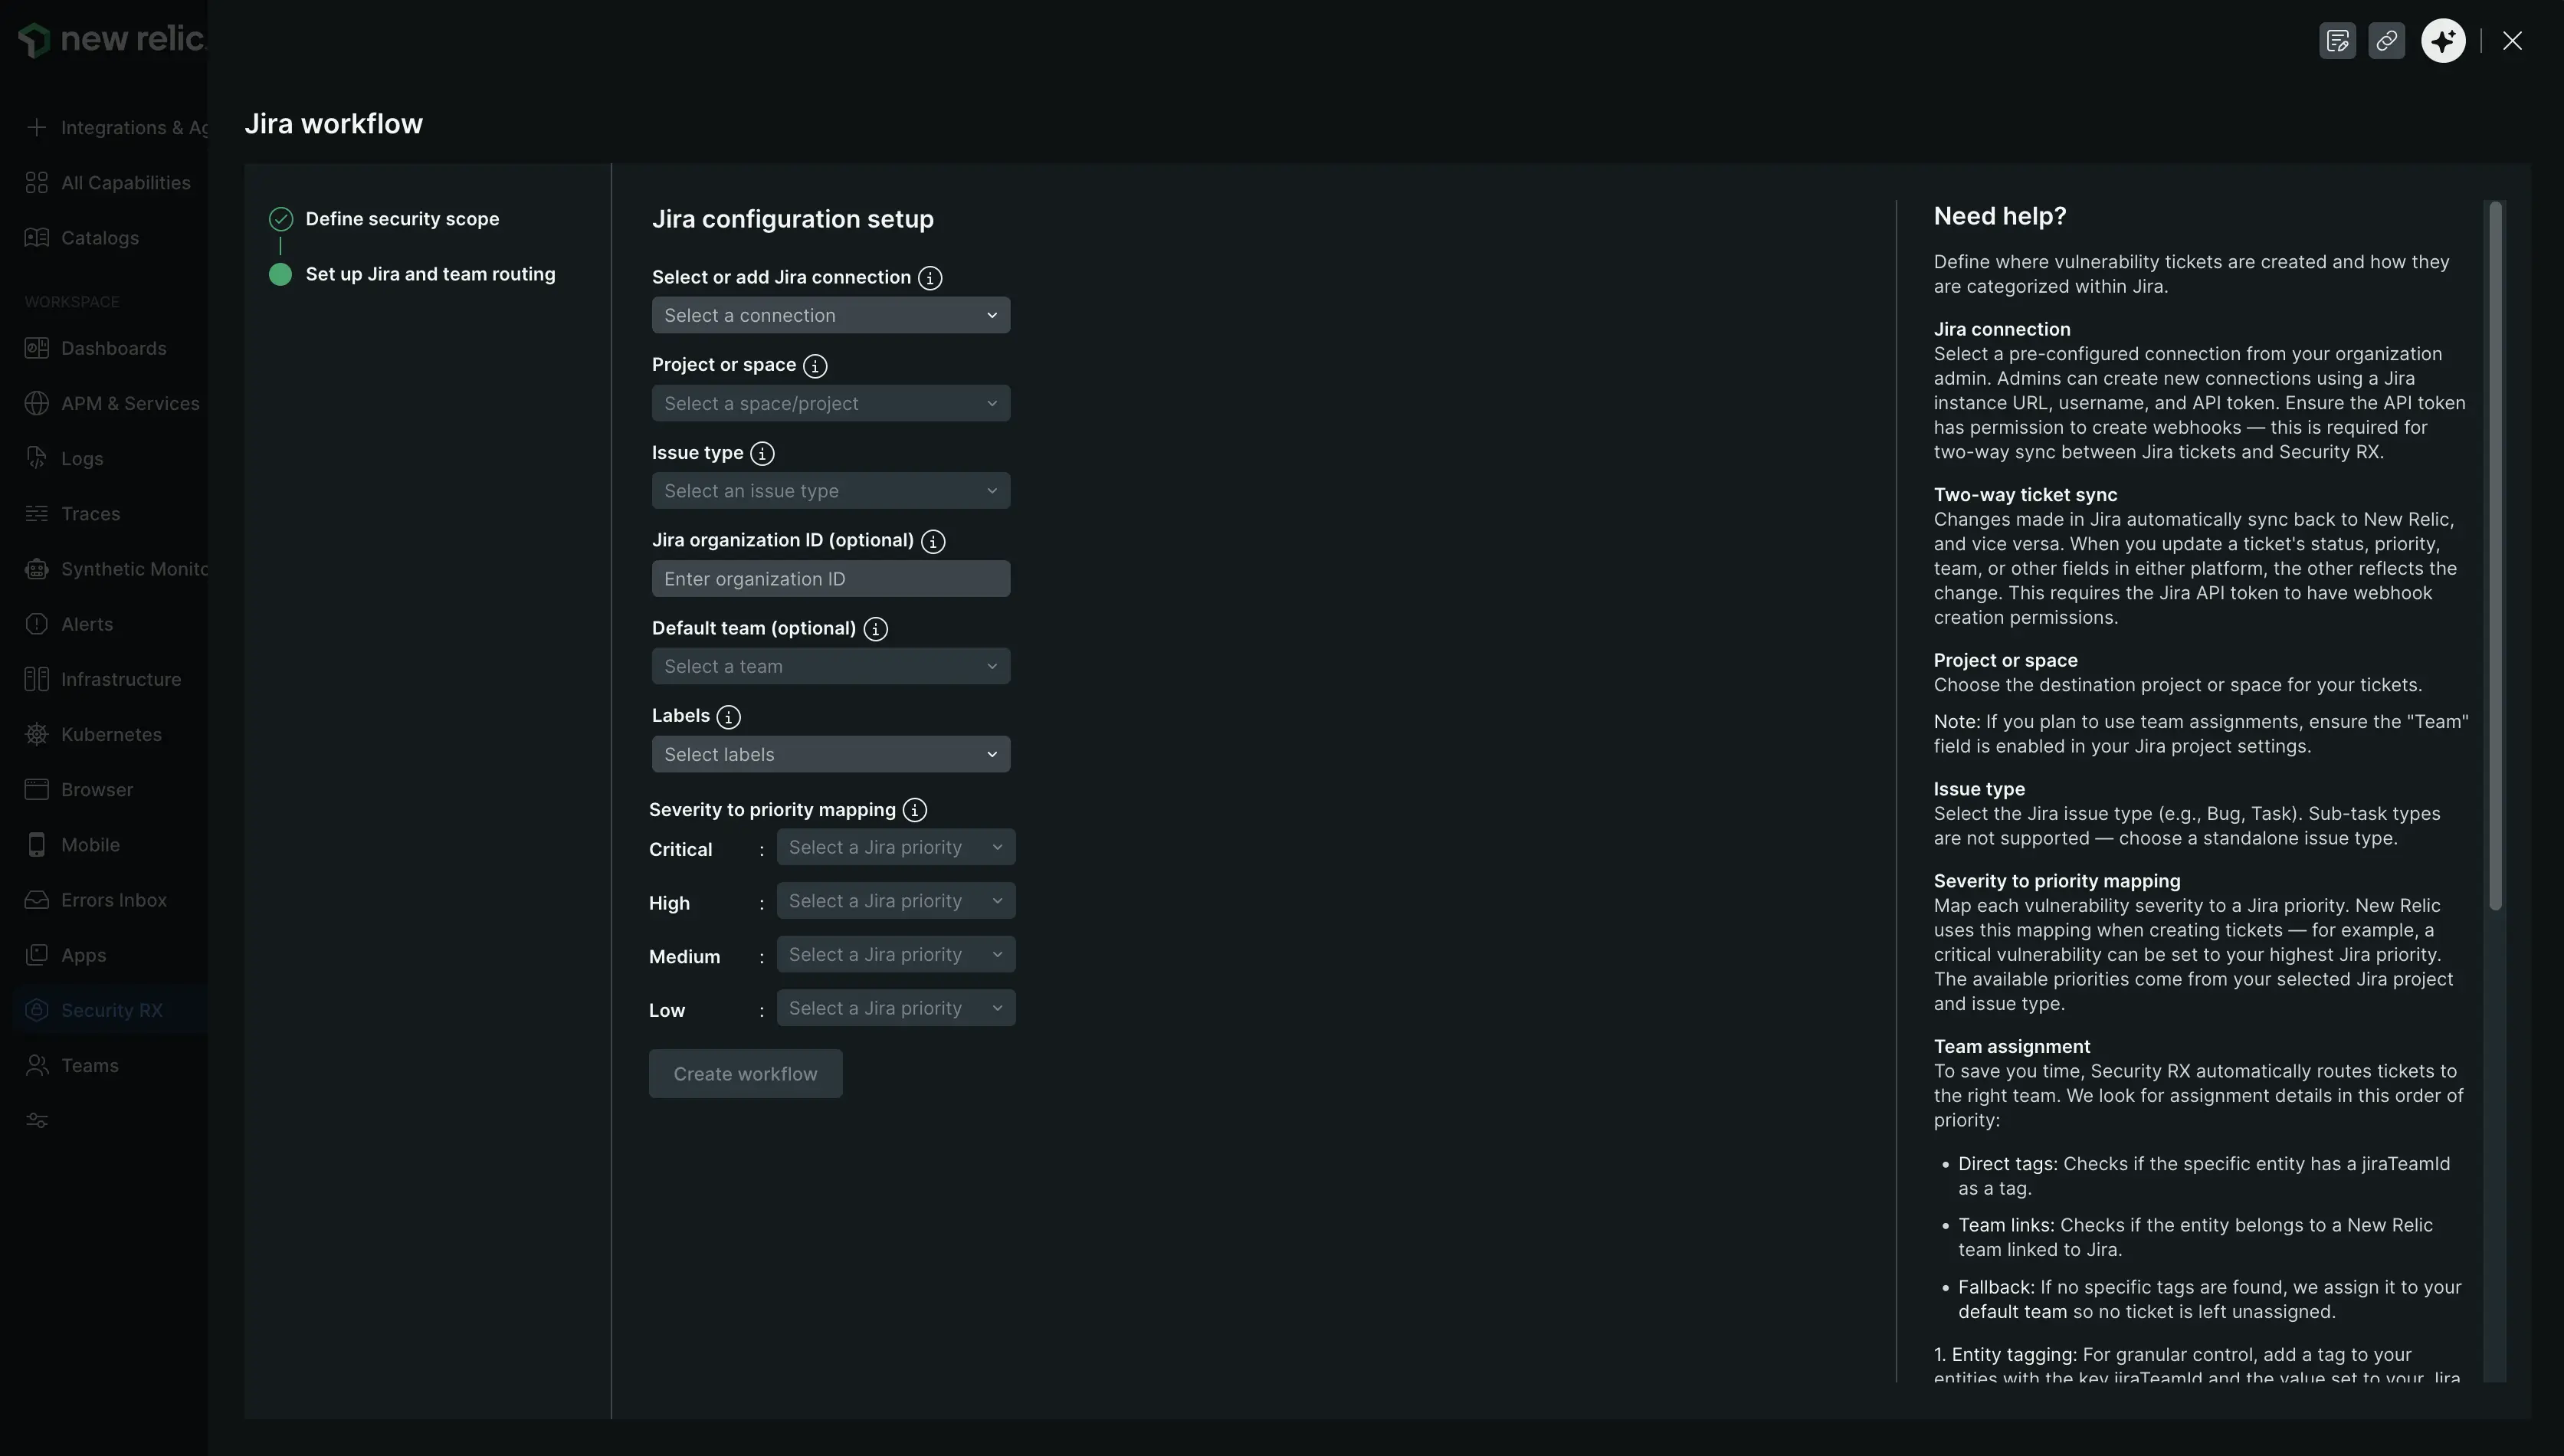
Configure the following fields:
Select or add Jira connection
Select a pre-configured connection from the dropdown. If you have admin permissions, you can create a new connection from this page.
Project or space
Select the Jira project where you want to create tickets. The dropdown populates after you select a connection.
팁
If you plan to use team assignments, make sure the Team field is enabled in your Jira project settings.
Issue type
Select the issue type for created tickets. Only Story, Bug, and Task are supported. Security RX doesn't support sub-task types.
Jira organization ID (optional)
Enter your Jira organization ID to enable team-based routing. To find it, log into home.atlassian.com and look for the alphanumeric string after /o/ in the URL.
Default team (optional)
After entering a Jira organization ID, select a fallback team. This team receives tickets when no entity-specific team assignment is found. If no default team is set, tickets are created without team assignment.
Labels (optional)
Select labels to attach to all tickets created by this workflow. Available labels include CVE ID, status, priority, package, repository, account, and source.
Severity to priority mapping
Map each vulnerability severity to a Jira priority. New Relic uses this mapping when creating tickets. Available priorities come from your selected Jira project and issue type.
Team assignment
Security RX routes tickets to the right team using a three-tier priority system:
Entity tags (highest priority) — add a
jiraTeamIdtag directly to a New Relic entity. The value should be your Jira Team ID, found at home.atlassian.com after/team/in the URL. For bulk tagging, use the New Relic GitHub integration to syncjiraTeamIdas a custom property from your repositories.New Relic team links — if your entities are organized into New Relic teams, link each team to a Jira team:
- Go to Team Settings > Links > Add Link.
- Set the type to Atlassian Jira.
- Paste your Jira Team URL:
https://home.atlassian.com/o/{org-id}/people/team/{team-id}
Default team (fallback) — if no match is found via tags or team links, the workflow uses the default team configured during setup. If no default team is set, the ticket is created without team assignment.
Two-way synchronization
When you create a workflow, Security RX maps tickets between New Relic and your Jira project. Changes on either side automatically sync to the other.
New Relic → Jira (ticket creation):
Jira field | Populated from |
|---|---|
Summary | Vulnerability or work item name. |
Description | Vulnerability details and remediation guidance. |
Labels | Labels selected during workflow setup. |
Due date | Calculated from SLA days per severity. |
Priority | Mapped from vulnerability severity. |
Status | Mapped from work item status. |
Team | Resolved via team assignment logic. |
Issue type | Issue type selected during workflow setup. |
Jira → New Relic (status updates):
When you update a Jira ticket, the following changes sync back to New Relic:
Change in Jira | Reflected in New Relic |
|---|---|
Summary edited | Work item name updated. |
Description edited | Work item description updated. |
Labels changed | Labels updated. |
Due date changed | Due date updated. |
Priority changed | Priority remapped. |
Status changed | Status remapped. |
Team reassigned | Team ID updated. |
중요
Two-way sync requires the Jira API token to have webhook creation permissions. Without this, only outbound sync (New Relic → Jira) works.
Monitor a workflow
Go to Security RX > Workflows and select a workflow name to open the details page.
The details page shows:
- Workflow status — Active, Paused, or Scheduled.
- Tickets created — total tickets created by this workflow.
- Last run — when the workflow last executed.
- Configuration summary — accounts, aggregation level, sources, severities, schedule, Jira project, and labels.
- Jira issues over time — a chart of ticket creation activity.
- Active work items — a table of all tickets with current status, Jira links, and real-time sync status.
Pause and resume a workflow
You can pause a workflow at any time to stop it from creating new tickets. Pausing doesn't affect existing tickets. To pause or resume:
- Open the workflow details page.
- Select Pause workflow or Resume workflow.
- Confirm the action in the dialog.
Query work items with NRQL
Every Jira ticket created by a Security RX workflow is stored as a WorkItemV2 entity in New Relic. You can query these entities to build custom dashboards and reports.
팁
All queries must target the storage account where your work items are stored — your organization's designated storage account.
Count all tickets created by a workflow:
SELECT uniqueCount(id)FROM EntityWHERE type = 'WORK_ITEM_V2' AND `tags.srx-workflow` = 'jira' AND `tags.srx-wf-name` = 'your_workflow_name'SINCE 90 days agoBreak down tickets by severity:
SELECT uniqueCount(id)FROM EntityWHERE type = 'WORK_ITEM_V2' AND `tags.srx-workflow` = 'jira' AND `tags.srx-wf-name` = 'your_workflow_name'FACET `tags.srx-wf-wi-severity`SINCE 90 days agoTrack ticket creation over time:
SELECT uniqueCount(id)FROM EntityWHERE type = 'WORK_ITEM_V2' AND `tags.srx-workflow` = 'jira' AND `tags.srx-wf-name` = 'your_workflow_name'FACET dateOf(metadata.createdAt)SINCE 90 days agoLIMIT 2000Tickets by current status across all workflows:
SELECT uniqueCount(id)FROM EntityWHERE type = 'WORK_ITEM_V2' AND `tags.srx-workflow` = 'jira'FACET statusSINCE 90 days agoAvailable fields:
Field | Description |
|---|---|
| Unique work item identifier. |
| Jira ticket summary. |
| Current ticket status. |
| Ticket priority. |
| Creation timestamp (epoch ms). |
| Workflow provider type ( |
| Name of the workflow that created this ticket. |
| New Relic account ID. |
| Vulnerability severity level. |
| Vulnerability detection source. |
| Entity GUID of the affected application. |