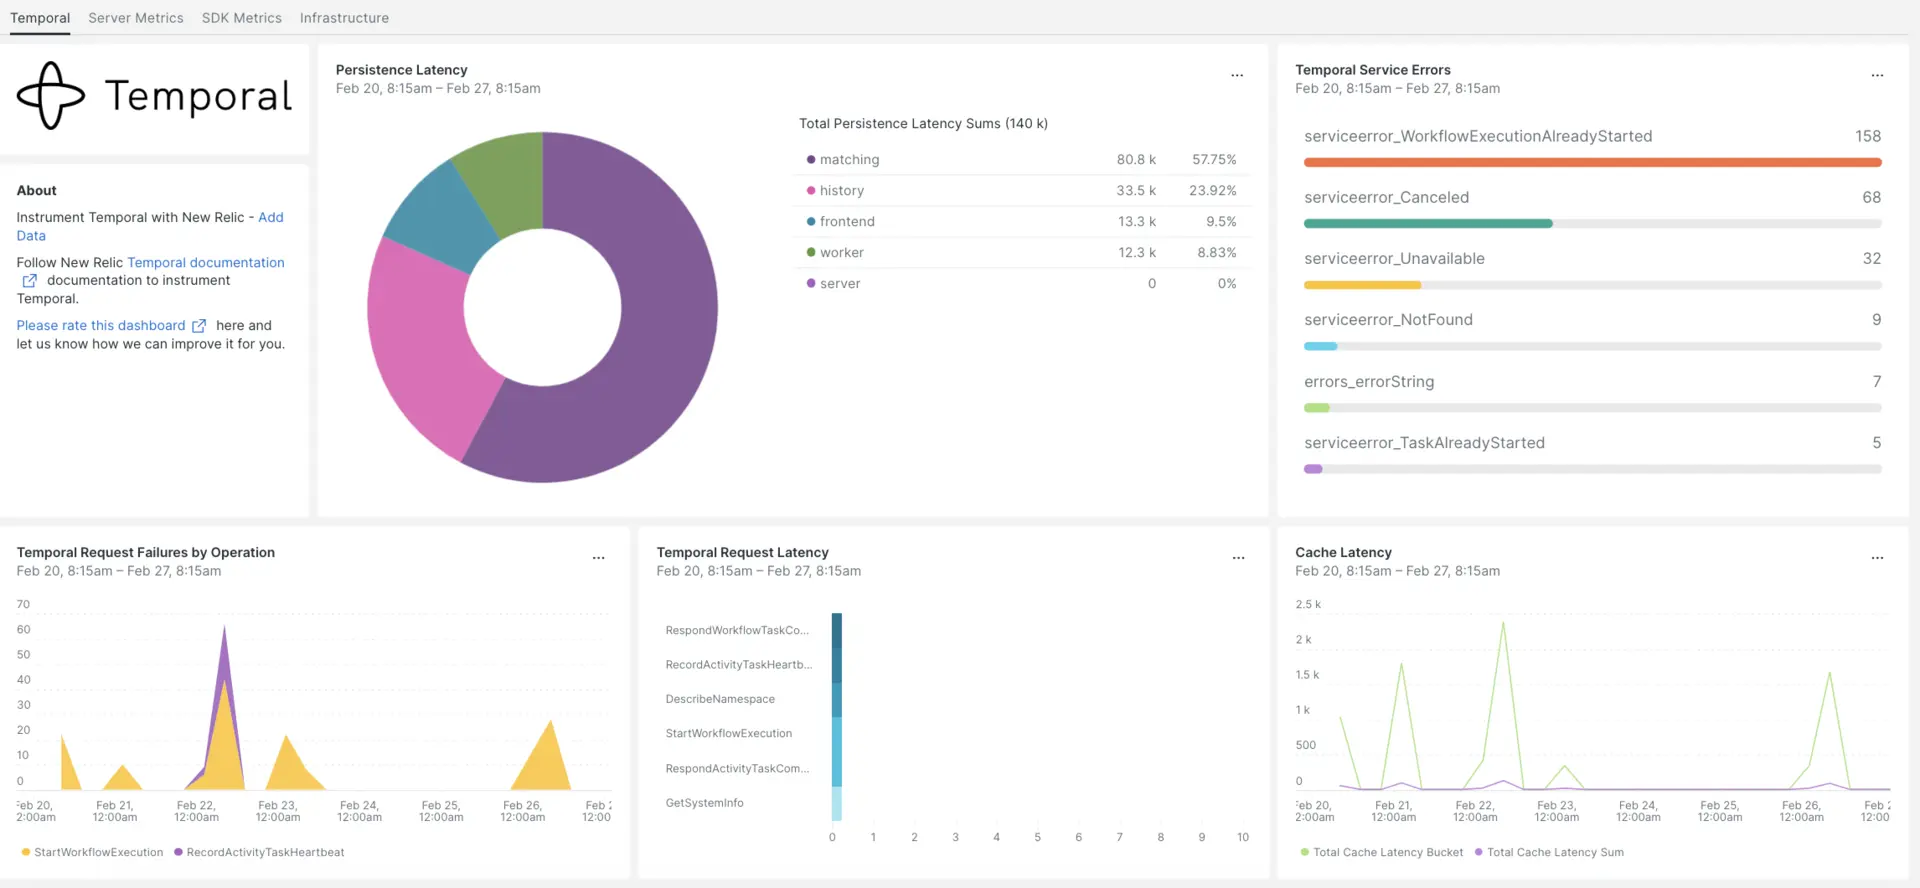
Nossa integração Temporal monitora o desempenho de seus dados Temporais, ajudando você a diagnosticar problemas em seu aplicativo distribuído por gravação, tolerante a falhas e escalável. Nossa integração Temporal oferece um dashboard pré-construído com as métricas mais importantes do seu aplicativo Temporal SDK.

Depois de configurar a integração com o New Relic, veja seus dados em painéis como estes, prontos para uso.
Instalar o agente de infraestrutura
Para usar a integração Temporal, é necessário primeiro instalar o agente de infraestrutura no mesmo host. O agente de infraestrutura monitora o próprio host, enquanto a integração que você instalará na próxima etapa estende seu monitoramento com dados específicos do tempo, como banco de dados e instância métrica.
Expor métrica temporal
As etapas a seguir executarão uma instância local do Servidor Temporal usando o arquivo de configuração padrão docker-compose.yml:
Se ainda não o fez, instale
dockeredocker-composeem seu host:bash$sudo apt install docker$sudo apt install docker-composeClone o repositório:
bash$git clone https://github.com/temporalio/docker-compose.gitMude o diretório para a raiz do projeto:
bash$sudo nano docker-compose/docker-compose.ymlAdicione o endpoint e a porta do Prometheus ao arquivo
docker-compose.yml.Environment:- PROMETHEUS_ENDPOINT=0.0.0.0:8000ports:- 8000:8000Execute o comando
docker-compose uppara criar sua instância:bash$sudo docker-compose upConfirme se sua instância está sendo executada corretamente nos seguintes URLs:
- O servidor Temporal estará disponível em
localhost:7233. - A interface web Temporal estará disponível em
http://YOUR_DOMAIN:8080 - A métrica do servidor Temporal estará disponível na página
http://YOUR_DOMAIN:8000/metrics
- O servidor Temporal estará disponível em
Expor métricas do Java SDK
Agora você exporá a métrica do SDK Client que o Prometheus irá extrair:
Crie um arquivo
MetricsWorker.javana pasta principal do seu projeto://...// You need to import the following packages to set up metrics in Java.// See the Developer's guide for packages required for the other SDKs.import com.sun.net.httpserver.HttpServer;import com.uber.m3.tally.RootScopeBuilder;import com.uber.m3.tally.Scope;import com.uber.m3.util.Duration;import com.uber.m3.util.ImmutableMap;// See the Micrometer documentation for configuration details on other supported monitoring systems.// This example shows how to set up the Prometheus registry and stats reported.PrometheusMeterRegistry registry = new PrometheusMeterRegistry(PrometheusConfig.DEFAULT);StatsReporter reporter = new MicrometerClientStatsReporter(registry);// set up a new scope, report every 10 secondsScope scope = new RootScopeBuilder().tags(ImmutableMap.of("workerCustomTag1","workerCustomTag1Value","workerCustomTag2","workerCustomTag2Value")).reporter(reporter).reportEvery(com.uber.m3.util.Duration.ofSeconds(10));// For Prometheus collection, expose the scrape endpoint at port 8077. See Micrometer documentation for details on starting the Prometheus scrape endpoint. For example,HttpServer scrapeEndpoint = MetricsUtils.startPrometheusScrapeEndpoint(registry, 8077); //note: MetricsUtils is a utility file with the scrape endpoint configuration. See Micrometer docs for details on this configuration.// Stopping the starter stops the HTTP server that exposes the scrape endpoint.//Runtime.getRuntime().addShutdownHook(new Thread(() -> scrapeEndpoint.stop(1)));//Create Workflow service stubs to connect to the Frontend Service.WorkflowServiceStubs service = WorkflowServiceStubs.newServiceStubs(WorkflowServiceStubsOptions.newBuilder().setMetricsScope(scope) //set the metrics scope for the WorkflowServiceStubs.build());//Create a Workflow service client, which can be used to start, signal, and query Workflow Executions.WorkflowClient yourClient = WorkflowClient.newInstance(service,WorkflowClientOptions.newBuilder().build());//...Vá para o diretório do seu projeto e construa seu projeto:
bash$./gradlew buildInicie o trabalhador:
bash$./gradlew -q execute -PmainClass=<YOUR_METRICS_FILE>Verifique a métrica do trabalhador no endpoint exposto do Prometheus Scrape:
http://YOUR_DOMAIN:8077/metrics.Observação
Para mais informações sobre a configuração do SDK métrica, acesse a documentação oficial do Temporal.
Configurar NRI-Prometheus
Após uma instalação bem-sucedida, faça estas configurações do NRI-Prometheus:
Crie um arquivo com o nome
nri-prometheus-temporal-config.ymlneste caminho:bash$cd /etc/newrelic-infra/integrations.d/Aqui está um exemplo de arquivo de configuração. Certifique-se de atualizar os URLs do espaço reservado:
integrations:- name: nri-prometheusconfig:standalone: false# Defaults to true. When standalone is set to `false`, `nri-prometheus` requires an infrastructure agent to send data.emitters: infra-sdk# When running with infrastructure agent emitters will have to include infra-sdkcluster_name: Temporal_Server_Metrics# Match the name of your cluster with the name seen in New Relic.targets:- description: Temporal_Server_Metricsurls: ["http://<YOUR_DOMAIN>:8000/metrics", "http://<YOUR_DOMAIN>:8077/metrics"]# tls_config:# ca_file_path: "/etc/etcd/etcd-client-ca.crt"# cert_file_path: "/etc/etcd/etcd-client.crt"# key_file_path: "/etc/etcd/etcd-client.key"verbose: false# Defaults to false. This determines whether or not the integration should run in verbose mode.audit: false# Defaults to false and does not include verbose mode. Audit mode logs the uncompressed data sent to New Relic and can lead to a high log volume.# scrape_timeout: "YOUR_TIMEOUT_DURATION"# `scrape_timeout` is not a mandatory configuration and defaults to 30s. The HTTP client timeout when fetching data from endpoints.scrape_duration: "5s"# worker_threads: 4# `worker_threads` is not a mandatory configuration and defaults to `4` for clusters with more than 400 endpoints. Slowly increase the worker thread until scrape time falls between the desired `scrape_duration`. Note: Increasing this value too much results in huge memory consumption if too many metrics are scraped at once.insecure_skip_verify: false# Defaults to false. Determins if the integration should skip TLS verification or not.timeout: 10s
Configurar registro temporal
Para configurar o log temporal, siga as etapas descritas abaixo.
Execute este comando Docker para verificar o status do contêiner em execução:
bash$sudo docker psCopie o ID do contêiner para o contêiner temporalio/ui e execute este comando:
bash$sudo docker logs -f <container_id> &> /tmp/temporal.log &Depois, verifique se há um arquivo de log chamado
temporal.loglocalizado no diretório/tmp/.
Encaminhar registro para New Relic
Você pode usar nosso encaminhamento de logs para encaminhar o log temporal para New Relic.
Em máquinas Linux, certifique-se de que seu arquivo de log denominado
logging.ymlesteja neste caminho:bash$cd /etc/newrelic-infra/logging.d/Depois de encontrar o arquivo de log no caminho acima, inclua este script no arquivo
logging.yml:logs:- name: temporal.logfile: /tmp/temporal.logattributes:logtype: temporal_logsUse nossas instruções para reiniciar seu agente de infraestrutura:
bash$sudo systemctl restart newrelic-infra.serviceAguarde alguns minutos até que os dados comecem a fluir para sua conta New Relic.
Encontre seus dados
Você pode escolher nosso modelo dashboard pré-construído chamado Temporal para monitor sua métrica Temporal. Siga estas etapas para usar nosso modelo dashboard pré-construído:
De one.newrelic.com, acesse a página + Integrations & Agents .
Clique no Dashboards.
Na barra de pesquisa, digite Temporal.
Quando o dashboard Temporal aparecer, clique para instalá-lo.
Seu dashboard temporal é considerado um dashboard personalizado e pode ser encontrado na interface do painel. Para obter documentos sobre como usar e editar o painel, consulte nossa documentação dashboard .
Aqui está uma consulta NRQL para verificar a soma da latência da solicitação temporal:
SELECT sum(temporal_request_latency_sum) FROM Metric WHERE scrapedTargetURL = 'http://<YOUR_DOMAIN>:8000/metrics'