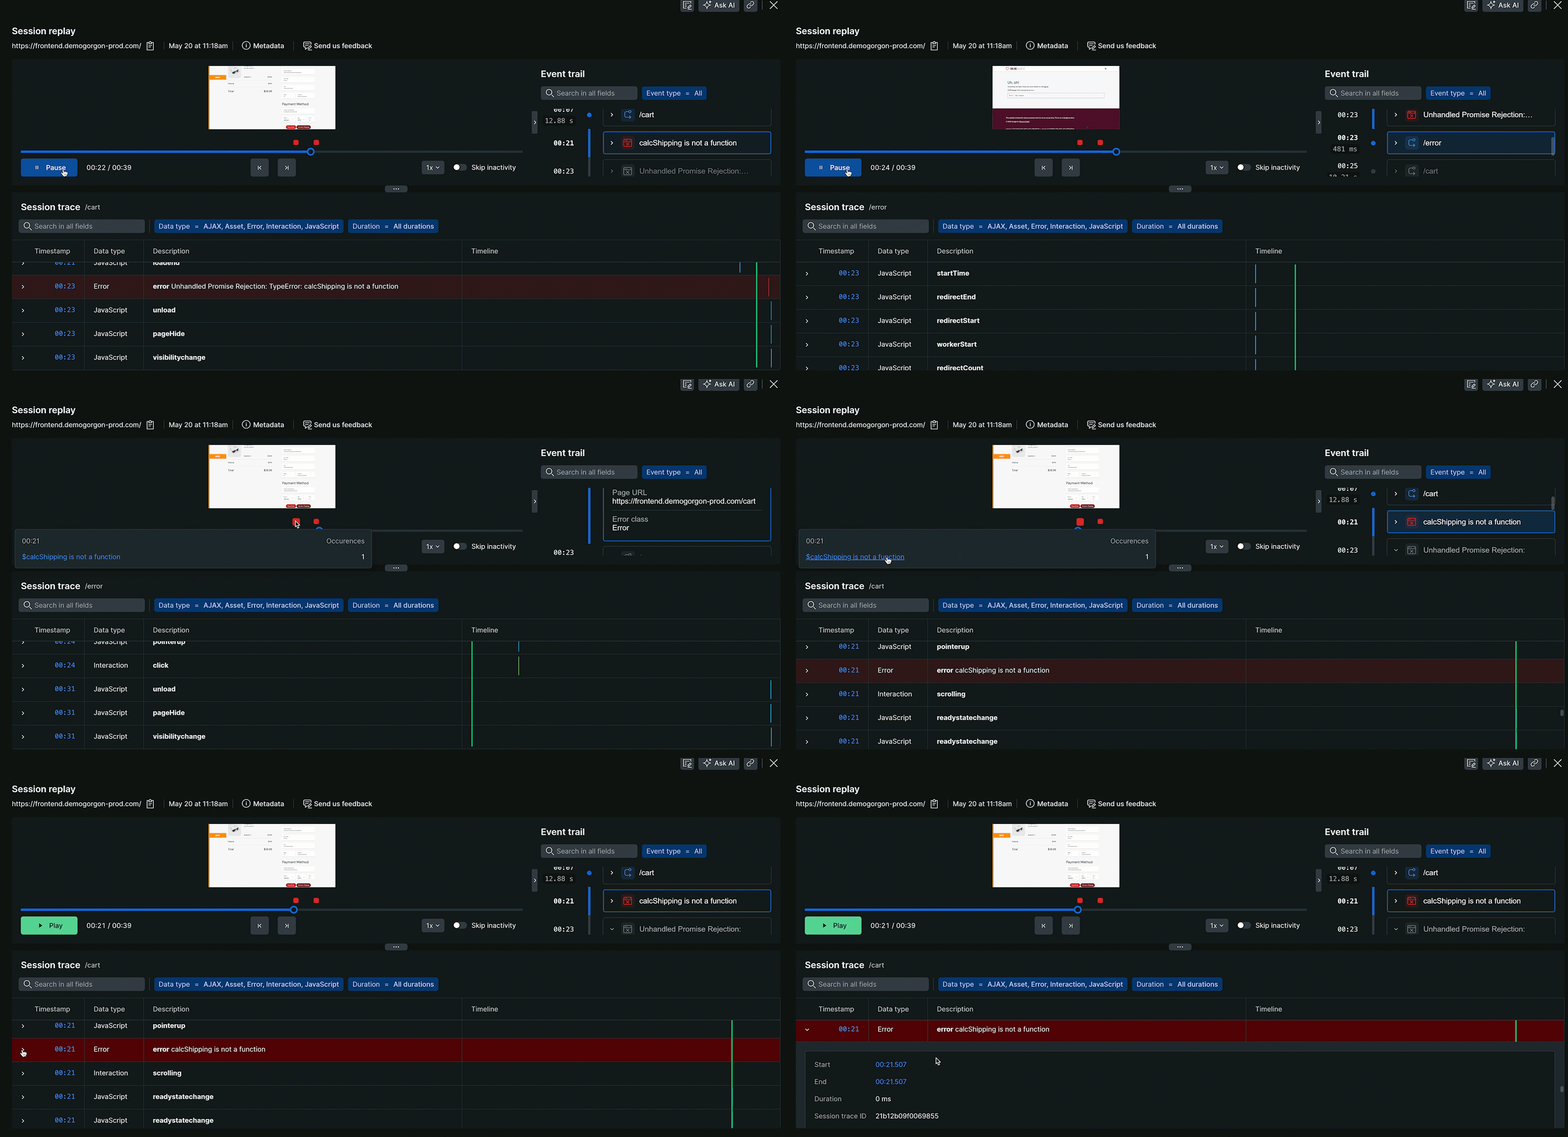
Session replay captures interactions on your web app and maps other telemetry data to help you understand your user's journeys. Session replay can be used for troubleshooting and improving the end-user experience, such as:
- Troubleshooting JavaScript errors: Troubleshoot the cause of an error by seeing what the user was doing when the error occurred. For example, if an end user receives an error while trying to complete an ecommerce transaction, you can use session replay to see which steps they took and what data they entered before the error occurred. This can help you quickly identify and fix the root cause of the problem.
- Improving the user experience: Discover areas of your web app that are causing users frustration. For example, you might see that users are getting lost in your navigation or clicking on buttons that don't do anything.
- Identifying issues in key user journeys: Identify areas of your web app that are causing performance problems. For example, if session replay reveals the
/cart/checkoutpage is experiencing excessive page load time, you'd prioritize fixing this critical user journey.
How session replay works
When a user loads your web page, session replay takes a snapshot of the Document Object Model (DOM), which represents the page's structure and visual elements. To ensure accurate styling information, the browser agent accesses your CSS files. The agent then integrates these styles directly into the replay recording, eliminating the need to reference external CSS files during playback. As the user interacts with the page, a library within the browser agent captures any changes made to the DOM. This captured data is then stored securely in New Relic's database.
Replays store up to:
- 4 hours of a user session
- 30 minutes of inactivity
By default, browser event data is stored 8 days, but actual data retention depends on your account.
For more details on session replay, see the following sections:
- Data consumption: View or project data consumption.
- User privacy and security concerns: Learn how we protect your user data and meet privacy requirements.
- Session replay and your app's performance: Learn how session replay minimizes impact on your app's performance.
Get started
Enable session replay
- Go to one.newrelic.com > All Capabilities > Browser.
- Select your browser app.
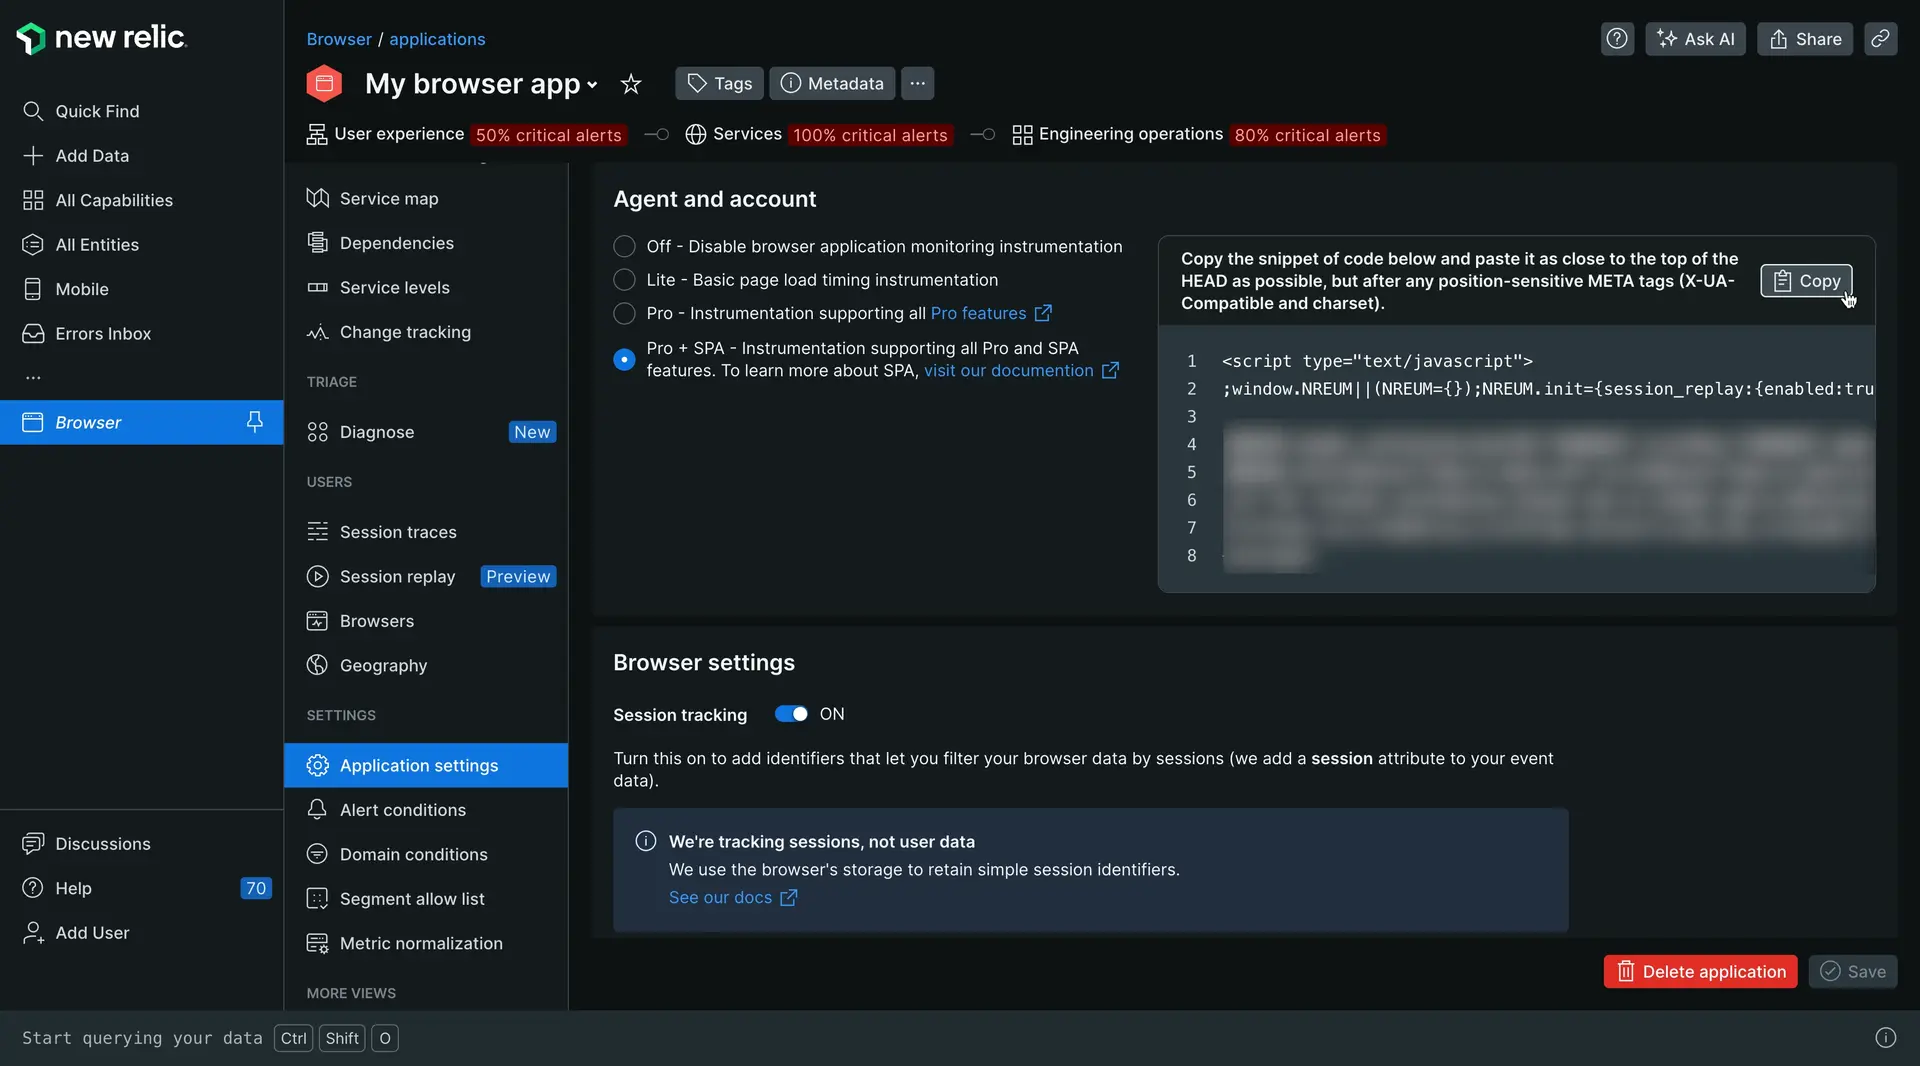
- In the left-hand menu, click Application settings.
- On the Application settings page, make sure Pro or Pro + SPA browser agent is selected. Session replay is not available for the Lite browser agent.
- Toggle ON Session tracking and Session replay settings.
Configure sampling rates
Set a sampling rate (0%-100%) for the following samples:
User sessions records a random sample of all user sessions.
Errored session records a random sample of all errored sessions. The agent buffers a sliding window of data for up to 30 seconds on the client-side, and if errors occur, the buffered data will be harvested and the remainder of the session will be recorded. If an error does not occur, the replay is never harvested.
For example, if you set the session sampling rate to 50% and the error sampling rate to 100%, it means that:
Half of all user sessions will be recorded.
All errored sessions will be recorded, even if they're not part of the 50% sample.
(Optional) Configure privacy settings
By default, all text and inputs are replaced with asterisks. Here's an example of how a replay looks with default privacy:
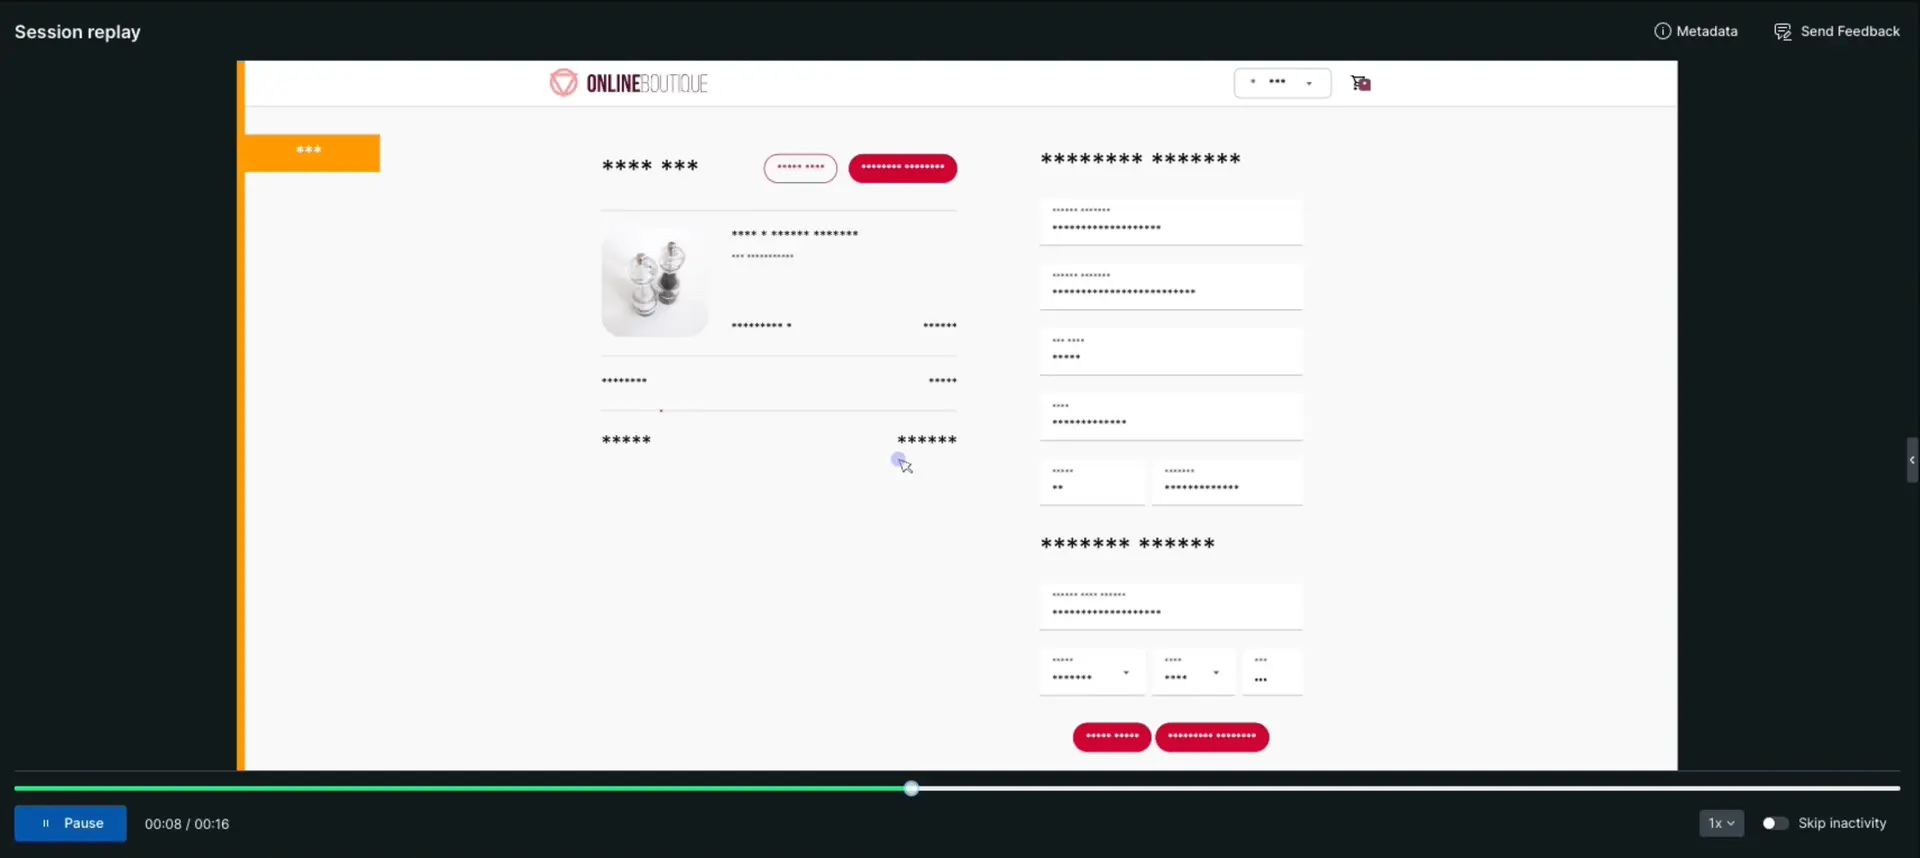
If this setting is appropriate, move onto the next step.
If you need to customize what content or user input is captured, you have options to mask, block, or ignore specific classes and attributes of content or user input. Make sure to check with your privacy team before changing the privacy settings.
Mask sensitive text
You can mask sensitive text, which means the text will be replaced with asterisks (*). For example, you can mask a user's account ID that shows in a URL.
To specify which input should be masked, you have a few options:
On the Application settings page, add your own CSS selectors or check the masking boxes. Note that using mask selectors will not mask user input, so if you need to hide user input, we recommend using block selectors.
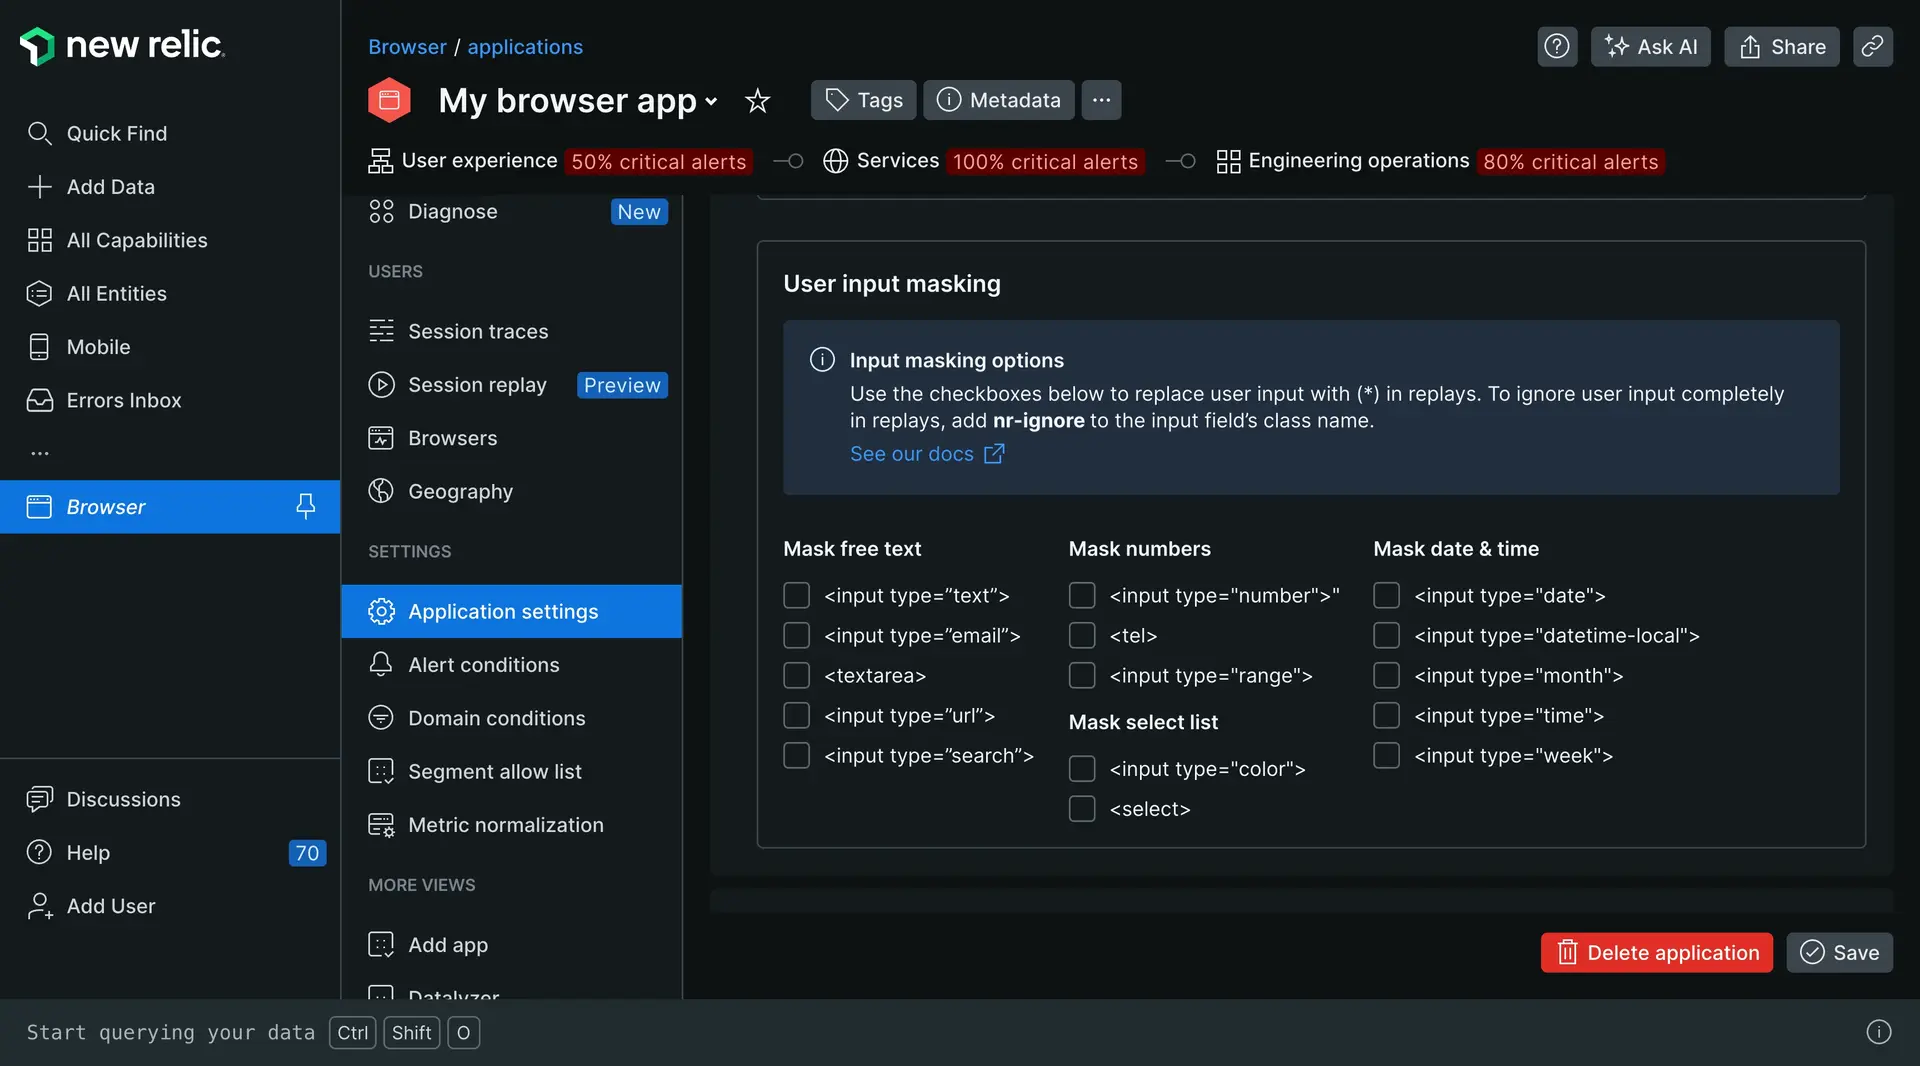
Add our CSS class
nr-maskor attributedata-nr-maskto your webpage HTML. For example, to mask an account ID from showing in the URL, addnr-maskto the<div>containing the account ID:<div>Account ID: <span class="nr-mask">99881123</span></div>These options use an asterisk (*) to mask all text in that element, hiding the actual text but revealing the number of characters entered. However, asterisks are not valid numbers, so masking number type-specific fields such as telephone or credit card numbers will result in a blank field in a replay.
Block site content
You can block entire sections of content on your site, which means the section will appear as an empty placeholder in session replay. For example, if you have an image on your About Us webpage and don’t need it captured, you could block the class containing the image.
To block specific classes or attributes, you have a few options:
On the Application settings page, add your CSS selectors in the *Block selectors field.
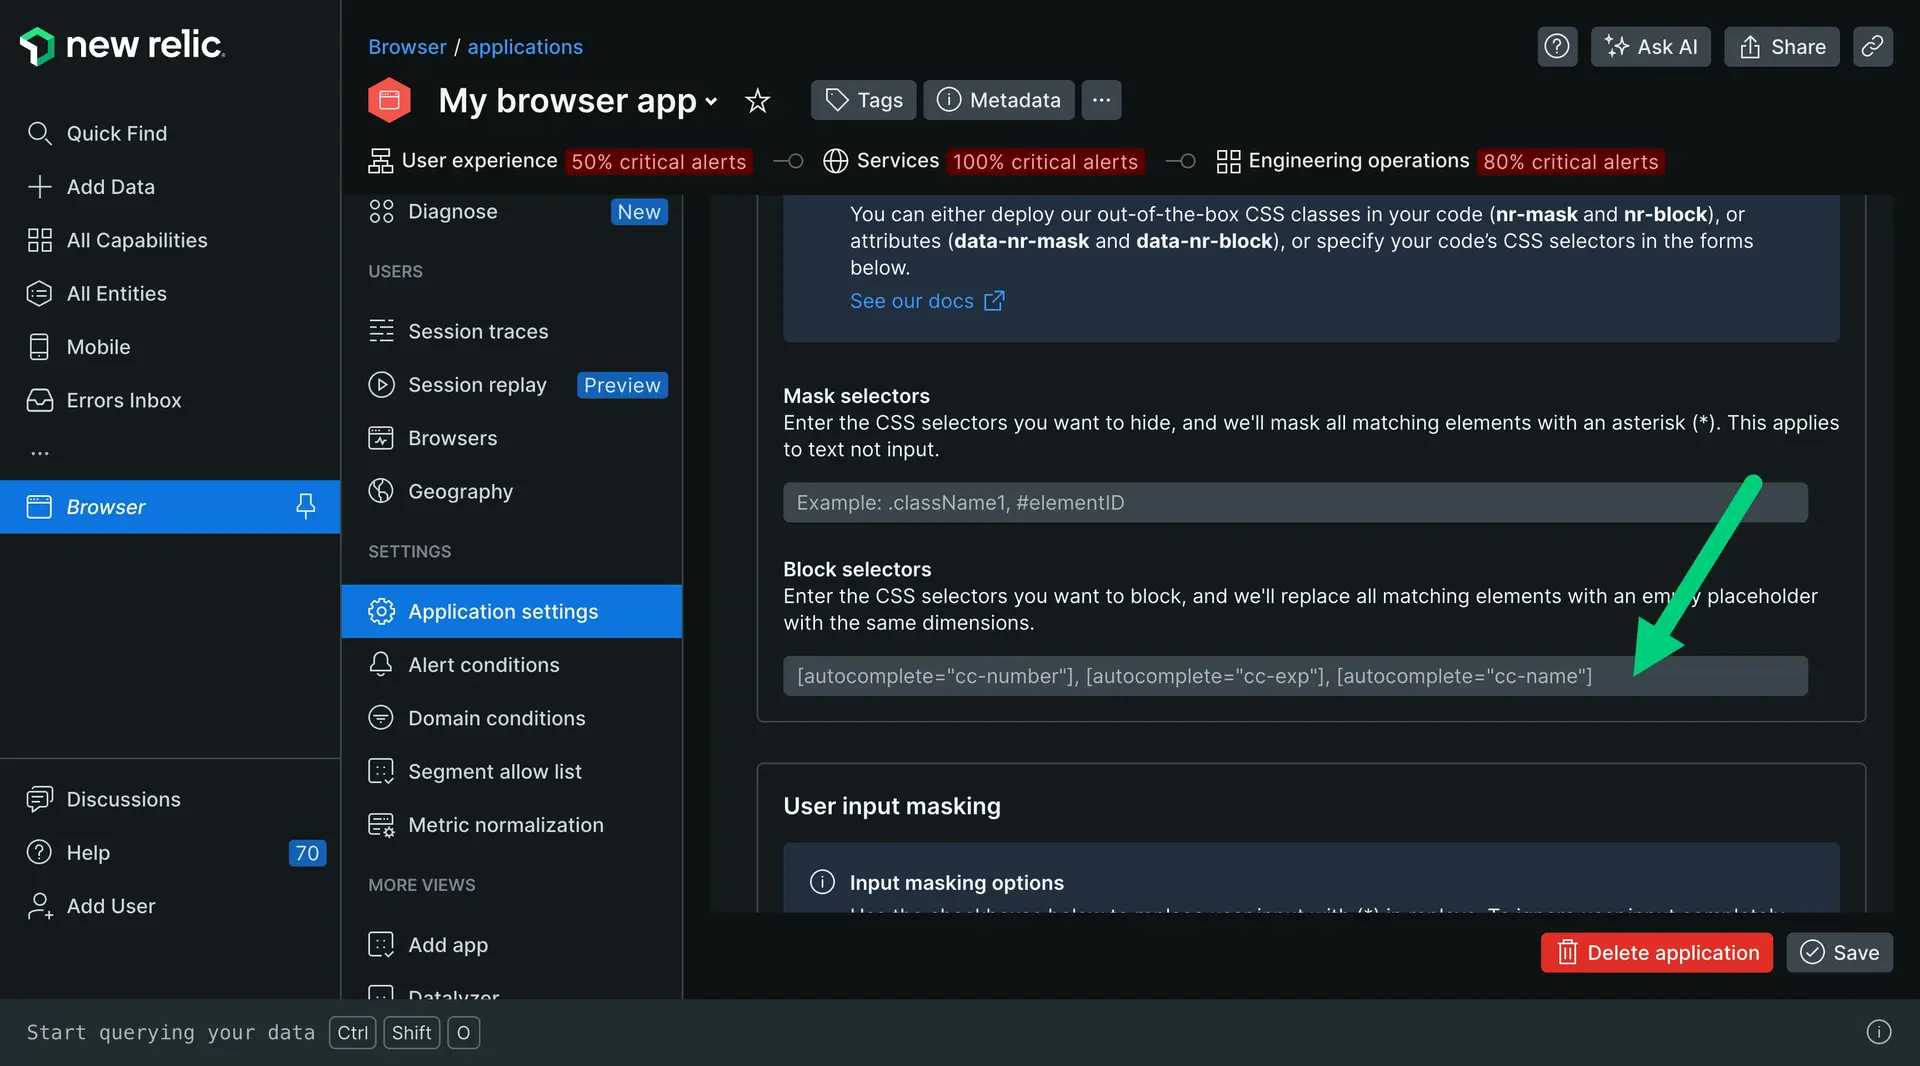
Manually add our CSS class
nr-blockor attributedata-nr-blockto your webpage HTML. For example, if you wanted to block irrelevant text and images from session replay, addnr-blockto<div class>:<html><head><title>Sample image and text</title></head><body><div class="image-text-container nr-block"><img src="https://example.com/image.png" alt="Image description" /></div></body></html>Ignore user input
You can ignore changes to a user input field, which means the input field will still be displayed in the replay, but you won't display changes to the value. For example, you could ignore the class containing the email address or credit card fields. Password input fields are always masked.
To ignore input, add the CSS class
nr-ignoreto the input field’s class name. For example, if you want to ignore sensitive information on a billing page, addclass="nr-ignore"to<input type>:<div class="sensitive-information"><h2>Sensitive Information</h2><p>Credit card number:<input type="number" class="nr-ignore" id="creditCardNumber" /></p><p>Expiration date:<input type="number" class="nr-ignore" id="expirationDate" /></p><p>CVV code: <input type="number" class="nr-ignore" id="cvvCode" /></p></div>
(For copy/paste deployed agents) Manually update the JavaScript snippet
If you deployed the browser agent using the copy/paste method, you'll need to copy/paste from the UI again. This is because when you enable session replay, the JavaScript snippet updates to include the new config updates.
To update your agent code:
View session replays in New Relic
You can find session replays in two places:
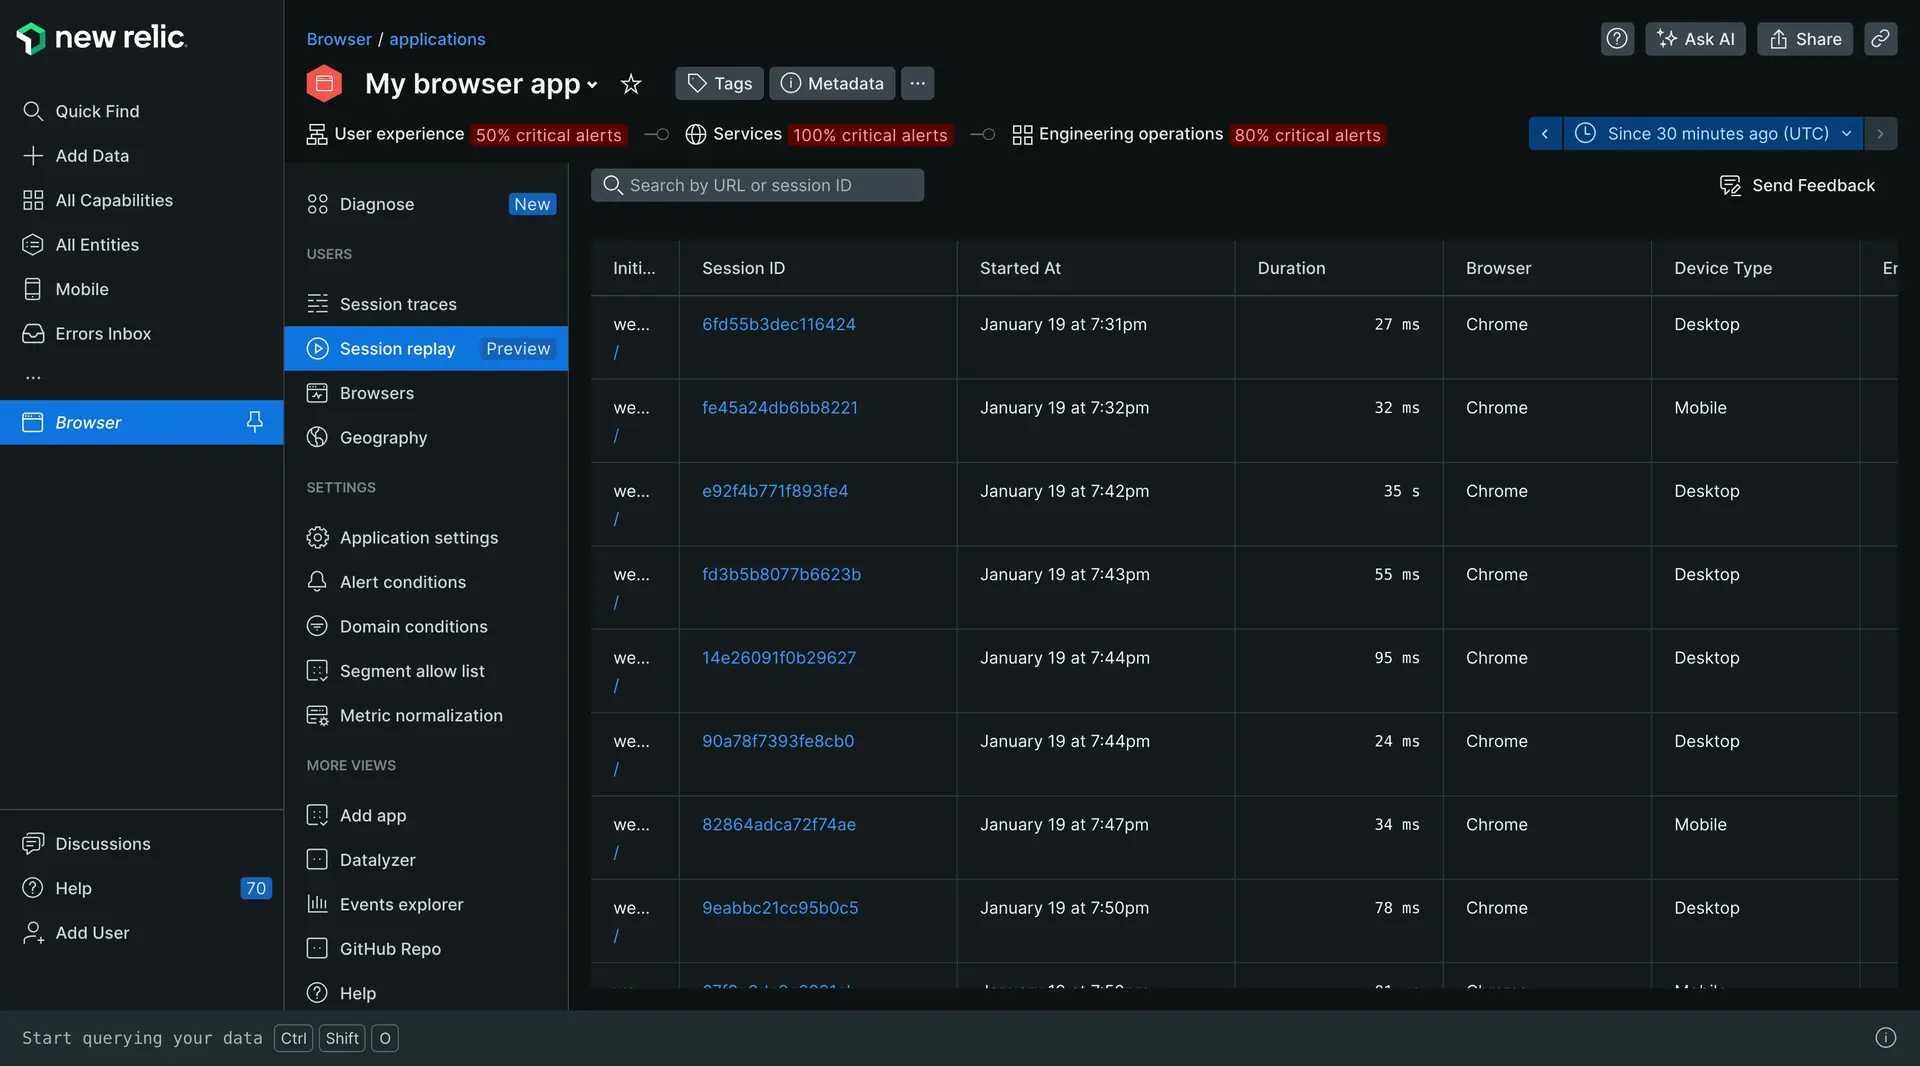
On the Session replay page:
Go to one.newrelic.com > All Capabilities > Browser.
Select your browser app.
In the left-hand menu, scroll down and click Session replay.
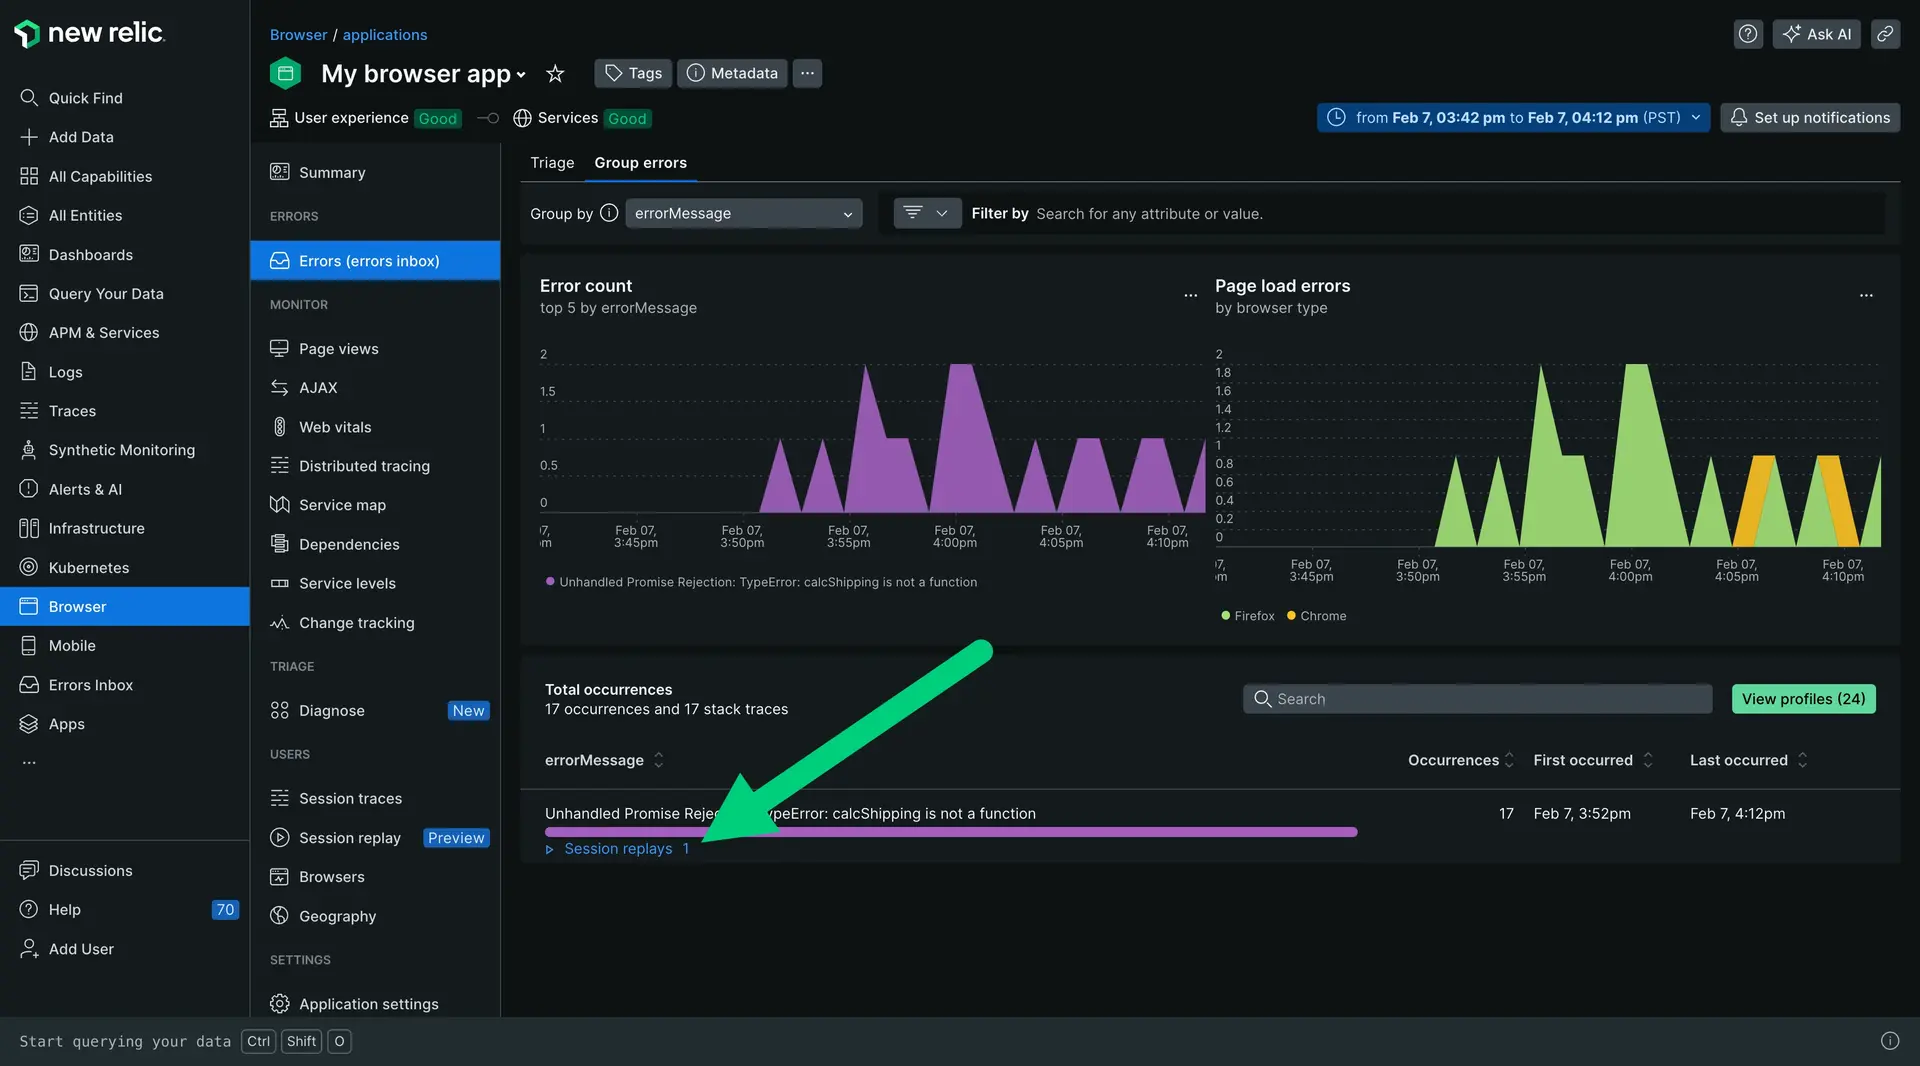
Click into each replay to view session details.
On the Errors inbox page:
重要
Certain settings, including enabling or disabling session replay and adjusting sample rates for overall and errors, have been moved to server-side configuration. For example, after you update these settings for copy/paste installation method, there's no need to redeploy the script. This is applicable for browser agent version 1.259.0 or higher.
Troubleshooting
Manually record session replays
If needed, you can programmatically force a session replay to start or stop recording using API methods. Here are some use cases:
- Allow users to opt in for interaction recording. For example, if you have a pop-up asking "Allow this session to be recorded for performance analysis?" and a user consents:
- Call
newrelic.recordReplay()to initiate recording. - Once the session is complete or consent is withdrawn, use
newrelic.pauseReplay()to stop capturing data.
- Call
- Record sessions based on specific criteria, such as:
- Start recording only for sessions on specific URLs such as a product checkout flow.
- Stop recording for sensitive pages such as
/billingor/health-records.
See the API documentation for instructions:
Disable automatic session replay tracking
You can prevent session replays from automatically starting, even when sampled, by setting the API configuration option autoStart to false. This is useful in scenarios where you need to prioritize specific actions over automatic sampling. For example, you might not want session replays to automatically run on sensitive pages, like HIPAA-compliant ones. In such cases, you can use the .start() API to manually trigger the replay feature after user consent is obtained (and your app calls .start())
Setting autoStart: false instructs the agent to defer its initialization until explicitly called using .start(). This ensures that session replays will not be created at all, even if the backend samples your application for recording.
重要
Calling .start() does not guarantee that a session replay will be recorded. It simply delays the module import and evaluation of sampling results until this point. If you need to force a recording, see Manually record session replays.
To start using this API, see newrelic.start.
Use Nerdgraph to configure replay settings
You can configure session replay settings using our NerdGraph API instead of using the UI. This method is helpful if you need to make bulk changes, such as applying sampling rates to multiple browser entities.
Here's an example mutation and variables to create a new browser application with default settings:
Mutation | Variables |
|---|---|
| |
Data consumption
Session replay follows the same consumption pricing as your other browser bytes. The amount of bytes produced depends on the count, length, and user-activity levels of sessions, as well as the complexity of your site's DOM.
The most accurate way to project your cost per replay is to enable the feature for a short test period and measure your actual consumption. Alternatively, you can use an average of 5.3 MB per replay as a rough approximation, though keep in mind that your actual cost may vary significantly. A simple formula to project your approximate costs is: sessions x sampling_rate x gb_per_replay x cost_per_gb. Here's an example:
1 million (sessions) x 5% (sampling_rate) x 0.0053 (gb_per_replay) x $0.35 (cost_per_gb) = $92.75 for 50,000 replaysTo control your consumption, adjust your sampling rates.
User privacy and security concerns
We prioritize data privacy and built session replay with strong default settings to minimize the potential exposure of sensitive customer information. You can further customize privacy settings to meet your specific needs.
Session replay does not capture screenshots or videos. Instead, it records only the essential DOM state changes needed to reconstruct user interactions. This significantly reduces the amount of data stored.
Compliance with data privacy laws
New Relic acts as a data processor under GDPR and a service provider under CCPA. This means we process data according to your instructions. Ultimately, compliance with these laws depends on how you implement session replay within your application.
By default, all text and user inputs, including personal data, are masked within the recordings. You can selectively unmask specific elements if needed, but the default ensures that no personally identifiable information is readily visible. This approach provides a strong foundation for data privacy while offering flexibility for your specific needs.
Session replay and your app's performance
Session replay minimizes impact on your app's performance with:
- Minimal initial impact: Session replay loads asynchronously after full page load, ensuring no interference with early page load performance metrics.
- DOM mutation tracking: Once loaded, session replay monitors DOM changes and reports them as compressed payloads. The size of these payloads correlates with the complexity of the DOM tree.
- Performance optimization techniques: Payload size can also increase if the DOM is large. However, session replay uses a number of techniques to reduce payload size, such as:
- GZIP compression
- Duplication reduction
- Strategic payload harvesting: It only sends a large (compressed) payload when the full DOM is captured, which typically only happens when the replay feature is first imported. After that, it will only send small payloads that relate to the user's actions. The browser agent will harvest on whatever happens first of the following:
- The payload reaches more than 64 KB compressed
- 60 seconds elapses
- The visibility of the page changes (tab change, focus, navigation, etc)
- The session ends
