---
title: Create a "Hello, World!" application
source: https://docs.newrelic.com/docs/new-relic-solutions/tutorials/build-hello-world-app
---
Here's how you build a "Hello, world!" application in New Relic.
In this guide, you:
- Create a local version of New Relic site where you prototype your application
- Share your application with your teammates by publishing it to Instant Observability
## Before you begin
Developing applications requires a New Relic account and the New Relic One CLI (`nr1`).
If you haven't already:
- [Sign up](https://newrelic.com/signup/) for a New Relic account. You need [publish and subscribe permissions](https://developer.newrelic.com/build-apps/permission-manage-apps/) to complete this guide.
- Install [Node.js](https://nodejs.org/en/download/)
- Complete the [CLI quick start](https://one.newrelic.com/launcher/developer-center.launcher?pane=eyJuZXJkbGV0SWQiOiJkZXZlbG9wZXItY2VudGVyLmRldmVsb3Blci1jZW50ZXIifQ==)
Now, you have a Nerdpack, called `my-awesome-nerdpack`. This Nerdpack has a Nerdlet and a launcher that you named (though, this guide uses the default launcher name, "launcher", and Nerdlet name, "home"). You use this Nerdpack throughout this guide.
Finally, make sure your `nr1` is up-to-date:
```sh
nr1 update
```
For additional details about setting up your environment, see [Set up your development environment](https://developer.newrelic.com/build-apps/set-up-dev-env/) and [Enable advanced configurations for your Nerdpack](https://docs.newrelic.com/docs/new-relic-solutions/new-relic-one/build-nr-apps/advanced-config).
> #### 💡 TIP
>
> If you use VSCode, we have an [extension](https://marketplace.visualstudio.com/items?itemName=new-relic.nr1) and an [extension pack](https://marketplace.visualstudio.com/items?itemName=new-relic.new-relic-extension-pack) you can use to build your app.
## Update and serve your application locally
With `nr1`, you can serve a local build of your Nerdpack to New Relic. This helps you develop your application in a production-like environment before you publish it.
Before you change any code, familiarize yourself with the Nerdpack's directory structure:
```txt lineHighlight=3-10,12
my-awesome-nerdpack/
├───README.md
├───launchers/
│ └───launcher/
│ └───nr1.json
├───nerdlets/
│ └───home
│ ├───index.js
│ ├───nr1.json
│ └───styles.scss
├───node_modules/
├───nr1.json
├───package-lock.json
└───package.json
```
The _launchers_ and _nerdlets_ directories contain the logic of your application. It's in these directories that you update most of your code. The _nr1.json_ files throughout the Nerdpack hold metadata about your Nerdpack, Nerdlets, and launchers.
> #### 💡 TIP
>
> Read [our documentation](https://docs.newrelic.com/docs/new-relic-solutions/build-nr-ui/nerdpack-file-structure/) to learn more about the Nerdpack file structure.
1. In _my-awesome-nerdpack/nerdlets/home/index.js_, change the default return message to "Hello, world!":
````jsx lineHighlight=7
import React from 'react';
// https://docs.newrelic.com/docs/new-relic-programmable-platform-introduction
export default class HomeNerdlet extends React.Component {
render() {
return Hello, world!
;
}
}
```
````
2. As an optional step, you can [add a custom launcher icon](https://developer.newrelic.com/build-apps/publish-deploy/catalog/#update-your-nerdpacks-icons) using any image named _icon.webp_.
In _launchers/launcher_, add an image called _icon.png_:
````txt lineHighlight=5
my-awesome-nerdpack/
├───README.md
├───launchers/
│ └───launcher/
│ ├───icon.png
│ └───nr1.json
├───nerdlets/
│ └───home
│ ├───index.js
│ ├───nr1.json
│ └───styles.scss
├───node_modules/
├───nr1.json
├───package-lock.json
└───package.json
```
This creates an icon for your launcher.
In the root directory, add the same image:
```txt lineHighlight=3
my-awesome-nerdpack/
├───README.md
├───icon.png
├───launchers/
│ └───launcher/
│ ├───icon.png
│ └───nr1.json
├───nerdlets/
│ └───home
│ ├───index.js
│ ├───nr1.json
│ └───styles.scss
├───node_modules/
├───nr1.json
├───package-lock.json
└───package.json
```
This sets the icon for the app details page.
````
3. Next, change the name of the launcher to something more meaningful. In _my-awesome-nerdpack/launchers/launcher/nr1.json_, change the `displayName` to "Hello world":
````json lineHighlight=4
{
"schemaType": "LAUNCHER",
"id": "launcher",
"displayName": "Hello world",
"description": "Describe me",
"rootNerdletId": "7c4d08ae-4e6f-40d8-80a9-f8b7722fb96b.home"
}
```
````
4. To see your new changes locally, start a local Node server from within the Nerdpack:
````bash
nr1 nerdpack:serve
[output] Found and loaded {success}2 {plain}nr1.json files on MyAwesomeNerdpack ({purple}123a4b95-678c-9012-3456-d7e8f90g1hi2{plain}) Nerdpack.
[output]
[output] {purple}Nerdpack:
[output] {success}✔ MyAwesomeNerdpack {plain}({purple}123a4b95-678c-9012-3456-d7e8f90g1hi2{plain}) {blue}nr1.json
[output]
[output] {purple}Launchers:
[output] {success}✔ launcher {blue}launchers/launcher/nr1.json
[output]
[output] {purple}Nerdlets:
[output] {success}✔ home {blue}nerdlets/home/nr1.json
[output]
[output] There is no certificate created yet.
[output] {success}✔ {plain}New certificate created.
[output]
[output] Webpack bundle analyzer is enabled (you need to wait for the first build to finish)
[output] └ You can head to {blue}http://127.0.0.1:27888
[output]
[output] {blue}NOTE: {plain}To verify how your assets will look in production, you need to
[output] add "--mode=prod" when starting the development server.
[output]
[output] 🛠 Built artifact files for:ex.js...
[output] ⁎ {purple}123a4b95-678c-9012-3456-d7e8f90g1hi2--home {plain}built {success}✔
[output]
[output] {success}✔ {plain}Nerdpack built successfully!
[output] {yellow}★ {plain}Starting as orchestrator...
[output]
[output] {success}✔ {plain}Server ready! Test it at: {blue}https://one.newrelic.com/?nerdpacks=local
[output] {blue}↩ {plain}Server will reload automatically if you modify any file!
[output]
[output] {blue}ℹ {plain}Additionally, you can test the following artifacts at:
[output]
[output] {purple}Launchers:
[output] ⁎ {success}launcher {blue}https://onenr.io/0JBQrggmDwZ
[output] {blue}ℹ {plain}You can use "npm start -- --mode=prod" to run the development server in prod mode.
```
````
5. Use the url at the bottom of the output to open your launcher:
````bash
[output] {purple}Launchers:
[output] ⁎ {success}launcher {blue}https://onenr.io/0JBQrggmDwZ
[output] {blue}ℹ {plain}You can use "npm start -- --mode=prod" to run the development server in prod mode.
```
````
6. Here, you see your Nerdlet with your "Hello, world!" message:

## Publish your application
Because you're serving your Nerdpack locally, your colleagues can't see it. When you're ready, publish it to [Instant Observability](https://newrelic.com/instant-observability/), our unified catalog of integrations, dashboards, alerts, Nerdpacks, and more. Read [our documentation](https://developer.newrelic.com/build-apps/permission-manage-apps/) to learn about Nerdpack permissions if you have trouble publishing your Nerdpack.
1. From its root directory, publish your Nerdpack:
````bash
nr1 nerdpack:publish
[output] Found and loaded {success}2 {plain}nr1.json files on MyAwesomeNerdpack ({purple}123a4b95-678c-9012-3456-d7e8f90g1hi2{plain}) Nerdpack.
[output]
[output] {purple}Nerdpack:
[output] {success}✔ MyAwesomeNerdpack ({purple}123a4b95-678c-9012-3456-d7e8f90g1hi2{plain}) {blue}nr1.json
[output]
[output] {purple}Launchers:
[output] {success}✔ {blue}launcher launchers/launcher/nr1.json
[output]
[output] {purple}Nerdlets:
[output] {success}✔ {blue}home nerdlets/home/nr1.json
[output]
[output] 🛠 Built artifact files for:
[output] ⁎ {purple}123a4b95-678c-9012-3456-d7e8f90g1hi2--home {plain}built {success}✔
[output]
[output] {success}✔ {plain}Nerdpack built successfully!
[output]
[output] Publishing Nerdpack MyAwesomeNerdpack ({purple}123a4b95-678c-9012-3456-d7e8f90g1hi2{plain})
[output] {success}✔ {plain}Nerdpack published successfully!
[output] {success}✔ {plain}Tagged {purple}123a4b95-678c-9012-3456-d7e8f90g1hi2 {plain}version {blue}0.1.0 {plain}as {blue}STABLE.
```
````
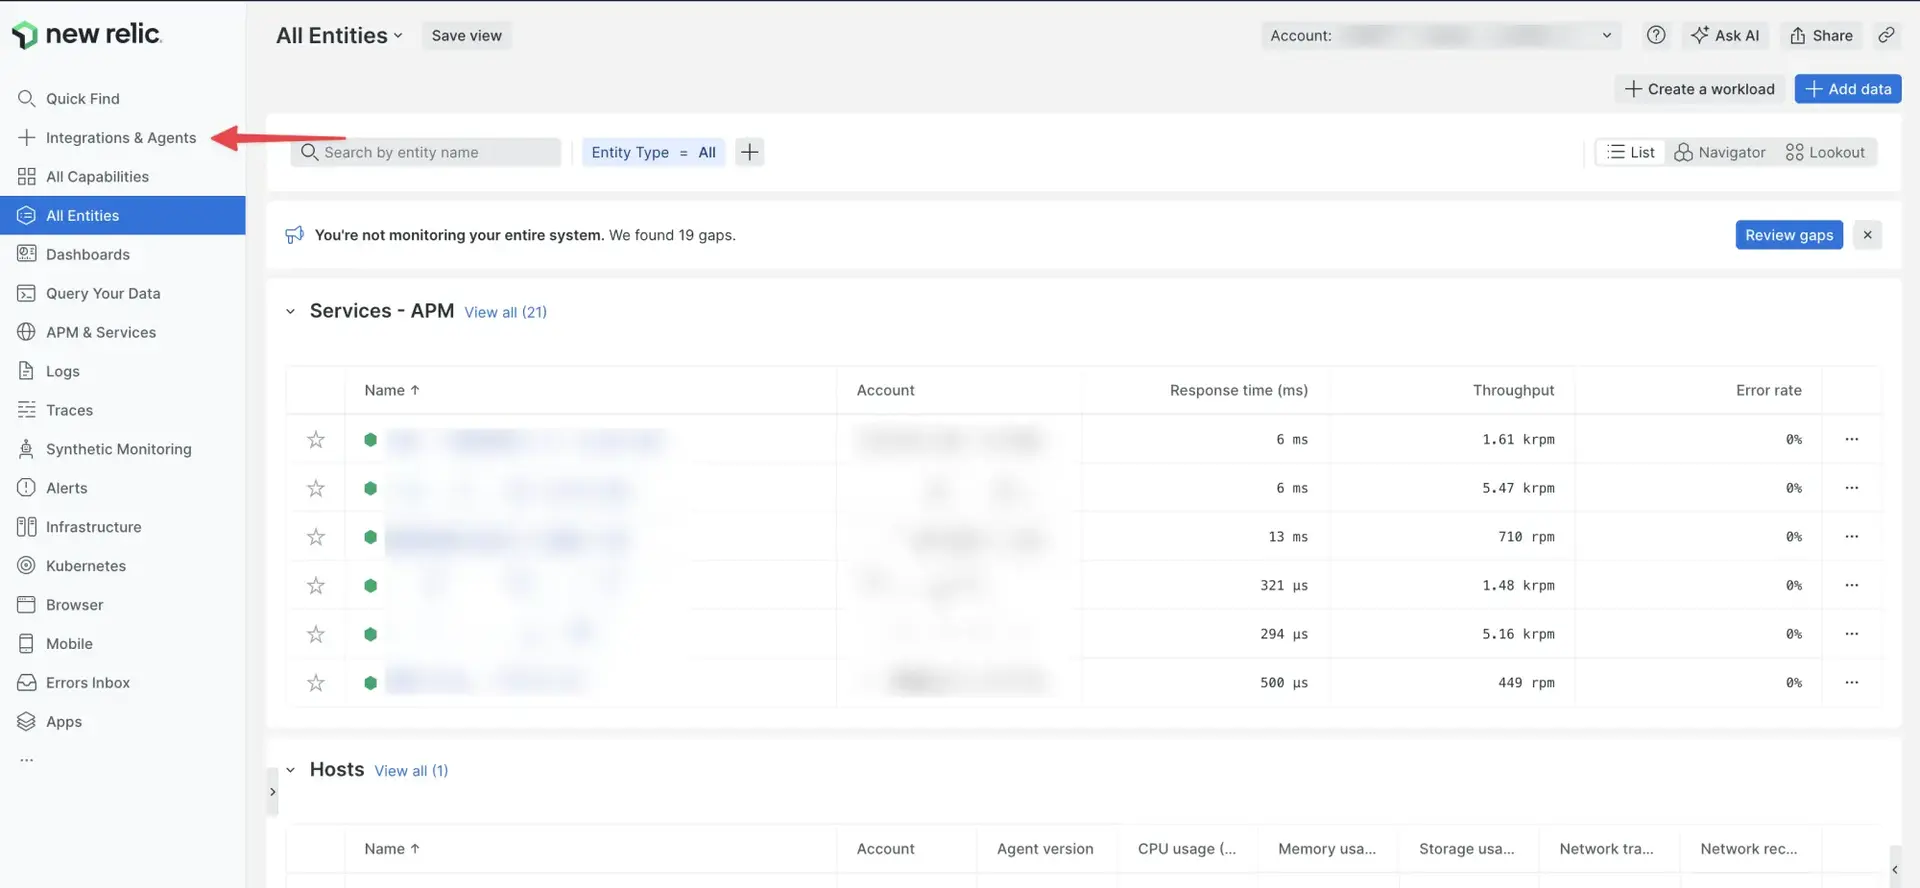
2. In [New Relic](https://one.newrelic.com), click **Integrations & Agents**:
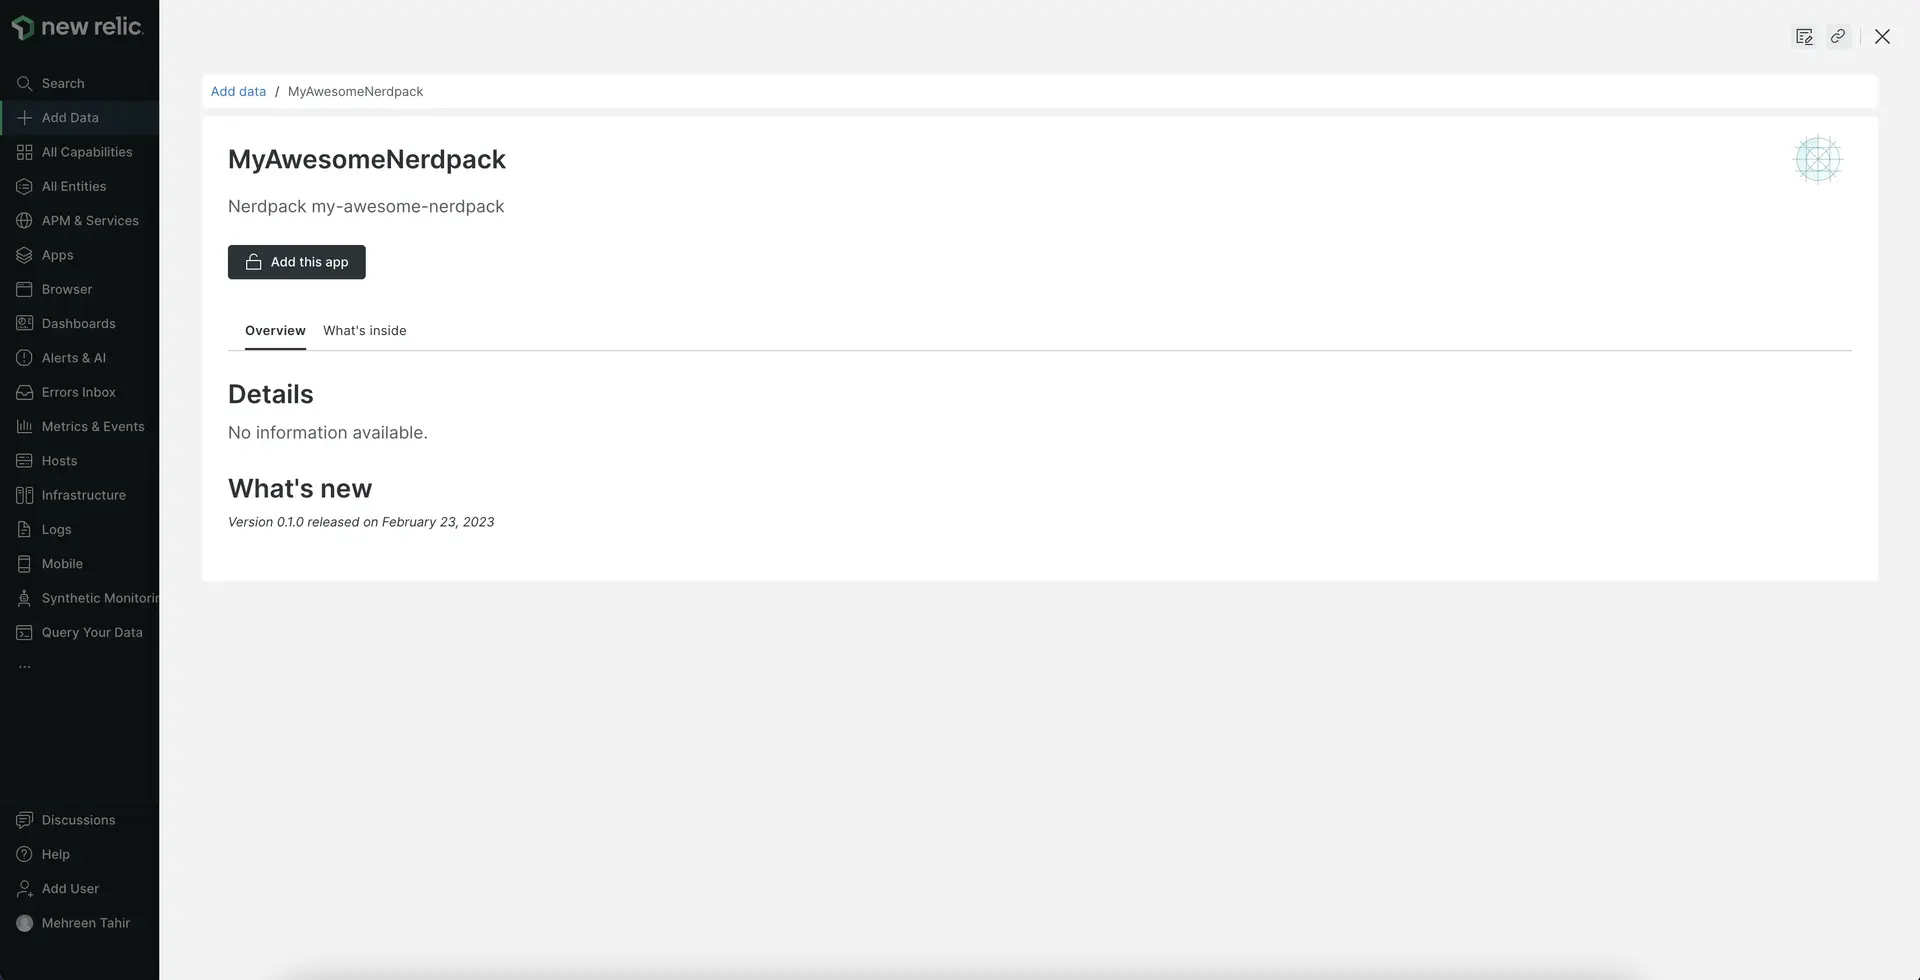
3. Find and click your new Nerdpack:

When your new application opens, notice that it doesn't display any descriptive information. The next section shows you how to add descriptive metadata.
## Describe your project with catalog details
Now that your new application is in Instant Observability, you can add information to help users understand what your application does and how to use it.
1. In your Nerdpack's root directory, execute the following:
````bash
nr1 create --type catalog
[output] {success}✔ {plain}created: launchers/launcher/catalog
[output] {success}✔ {plain}created: nerdlets/home/catalog
[output]
[output] {success}✔ {plain}catalog created successfully!
[output] {purple}catalog {plain}is available at "./catalog"
```
This creates three directories:
* _launchers/launcher/catalog_: This holds launcher screenshots
* _nerdlets/home/catalog_: This holds Nerdlet screenshots
* _catalog_: This holds documentation, screenshots, a description, and more information about your Nerdpack
If you had other launchers, Nerdlets, or custom visualizations, they would also get catalog directories from this command.
Here's how the results look in your project:
```txt lineHighlight=4-9,13-14,20-21
my-awesome-nerdpack/
├───README.md
├───icon.png
├───catalog/
│ ├───README.md
│ ├───additionalInfo.md
│ ├───config.json
│ ├───documentation.md
│ └───screenshots/
├───launchers/
│ └───launcher/
│ ├───icon.png
│ ├───catalog/
│ │ └───screenshots/
│ └───nr1.json
├───nerdlets/
│ └───home
│ ├───index.js
│ ├───nr1.json
│ ├───catalog/
│ │ └───screenshots/
│ └───styles.scss
├───node_modules/
├───nr1.json
├───package-lock.json
└───package.json
```
````
2. In the root _catalog_ directory of your project, add screenshots or various types of metadata to describe your project. You can also add screenshots in the catalog directories of your launcher or Nerdlet. For details about what you can add, see [Update your Nerdpack's catalog metadata](https://developer.newrelic.com/build-apps/publish-deploy/catalog/#update-your-nerdpacks-catalog-metadata).
3. After you add the screenshots and descriptions you want, execute the following to save your metadata to the Instant Observability catalog:
````bash
nr1 catalog:submit
```
````
4. Return to Instant Observability and refresh the page to see your new screenshots and metadata describing your project.

And if you added screenshots to your launcher or Nerdlet, you can see them under **What's inside**:

## Subscribe accounts to your application
You need to subscribe to your application to use it. To learn about what users on your account have the ability to subscribe, read our [permissions documentation](https://developer.newrelic.com/build-apps/permission-manage-apps/).
1. If you're not already there, navigate to your application in Instant Observability:

2. On your application's description page, click **Add this app**:

3. Select the accounts that you want to subscribe to the application, then update your accounts:

4. Go to the **Apps** page:

Here, you find the apps your accounts are susbscribed to.
5. Click your launcher:

Here, you see your application:

## Summary
Now that you've completed the steps in this example, you learned the basic steps to:
- Create a local application
- Publish the application to Instant Observability so you can share it with your colleagues
- Add details to the project in the catalog so users understand how to use it
- Subscribe accounts to your application so other users can use it