---
title: Configure privacy settings
source: https://docs.newrelic.com/docs/mobile-monitoring/mobile-monitoring-ui/mobile-session-replay/configure-privacy-settings
---
## Privacy and masking [#privacy-masking]
Choose the masking strategy that best fits your privacy requirements.
### Masking strategies [#masking-strategies]
Mobile Session Replay offers two masking strategies to balance privacy protection with replay utility. Your choice determines how sensitive data is handled in session recordings.
#### Default masking strategy [#default-strategy]
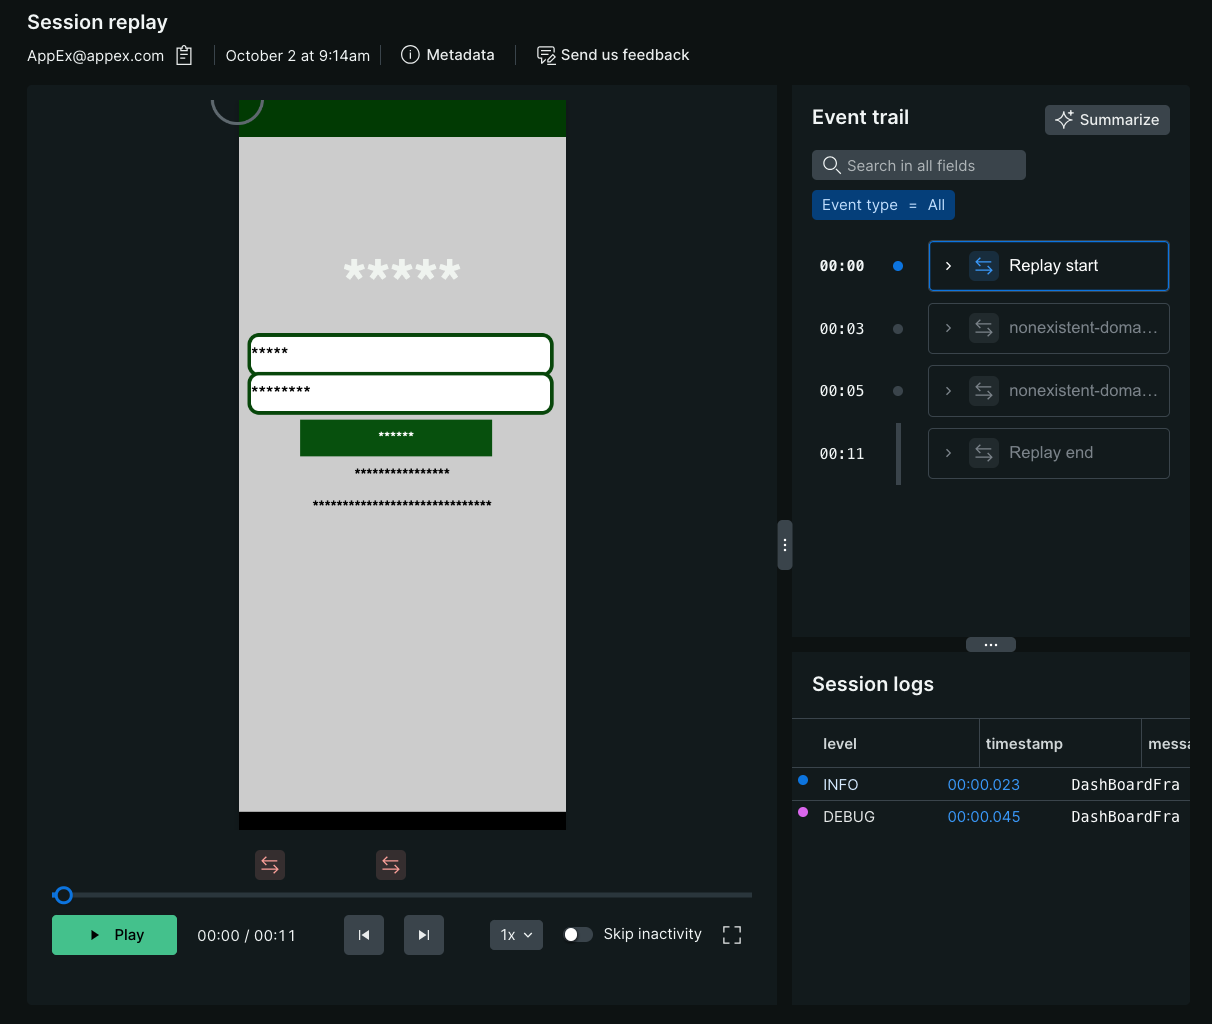
The default masking strategy provides maximum privacy protection by masking all text and images without exception. Choose this strategy when:
- Your app handles highly sensitive data (healthcare, financial services, etc.)
- Regulatory compliance requires strict data protection
- You want zero risk of capturing private information
**What gets masked:**
- All text is replaced with asterisks (e.g., "hello" becomes "**\***")
- All images are replaced with placeholder blocks of the same dimensions
- User taps and swipes are still captured (unless you hide them)
This ensures that even if you accidentally add unmasking code, the default strategy will always mask everything.
**Important limitations with default masking strategy:**
- Masking modes are not configurable
- Inline masking overrides (like `nr-unmask` tags) are ignored
- Server-side masking rules have no effect
#### Difference between Masking and Blocking [#masking-vs-blocking]
It is important to distinguish between Masking and Blocking, as they handle sensitive data differently in the replay:
- **Masking:** Replaces specific content while preserving the layout. Text becomes asterisks (\*) and images become placeholder blocks.
- **Blocking:** Creates a complete solid black overlay covering the entire view area.
**When a view is blocked:**
- The entire view area is obscured in the session replay.
- All content within that view is completely hidden.
- Cascading effect: All subviews are automatically blocked.
- User interactions in that area are not captured and the visual elements remain hidden
#### Custom masking strategy [#custom-strategy]
The custom masking strategy gives you fine-grained control over what gets masked and what remains visible. Use this strategy when:
- Your app has a mix of public and sensitive content
- You need to see specific UI elements to diagnose issues effectively
- You want to selectively unmask non-sensitive areas
A custom strategy consists of:
1. **Masking modes**: Baseline rules for different content types (text, images, interactions)
2. **Override rules**: Exceptions to mask or unmask specific components
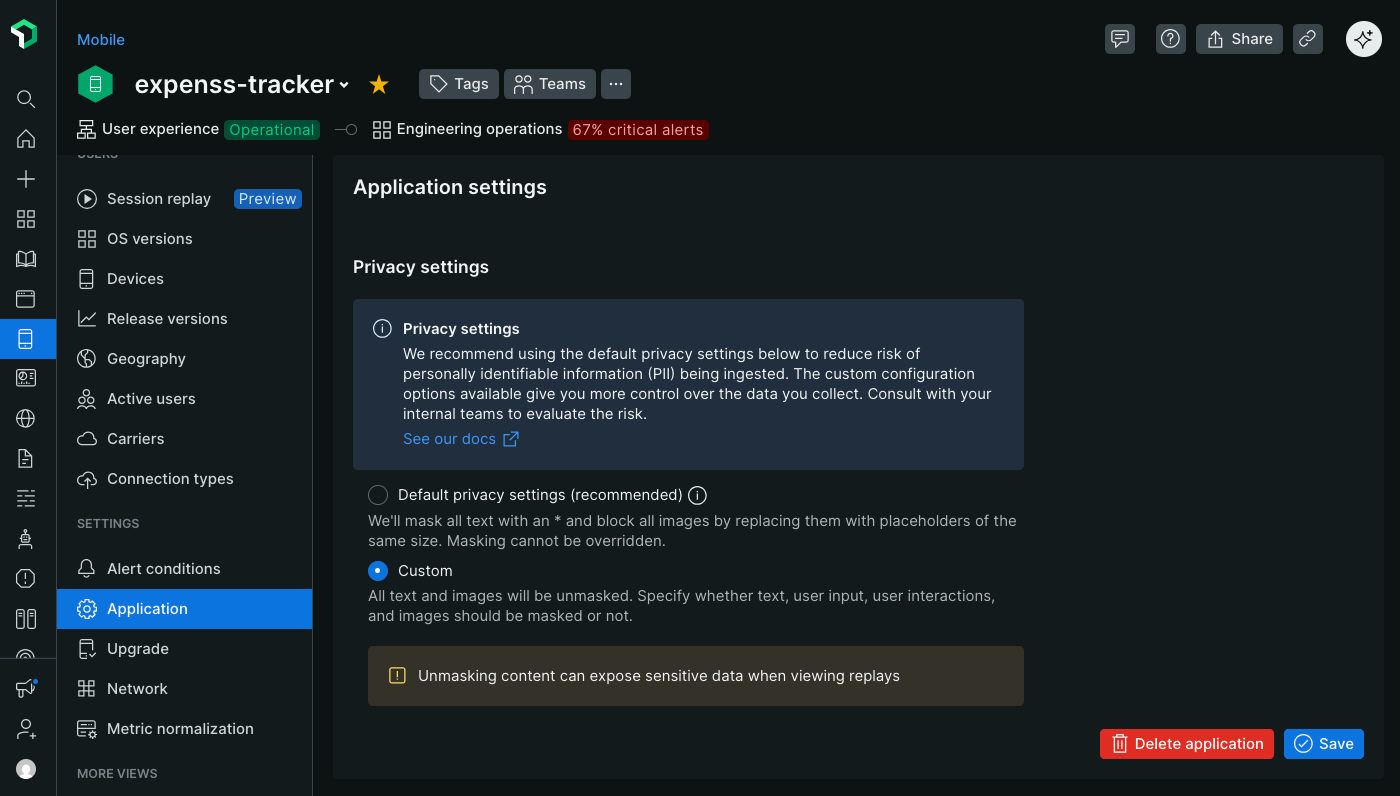
**To switch to custom masking:**
In the New Relic web interface:
1. Go to **Mobile > [your entity] > Settings > Application > Session Replay**
2. In the **Masking strategy** section, select **Custom**
3. Configure your masking modes (see next section)
4. Optionally, add override rules for specific components
### Masking modes [#masking-modes]
When using the custom masking strategy, masking modes establish the baseline privacy behavior for your session replays. These modes apply globally across your app unless overridden by specific rules for individual components.
**To configure masking modes:**
In the New Relic web interface:
1. Go to **Mobile > [your entity] > Settings > Application > Session Replay**
2. Ensure **Custom** masking strategy is selected
3. In the **Masking modes** section, toggle each mode on or off based on your needs
4. Changes take effect immediately for all new session recordings
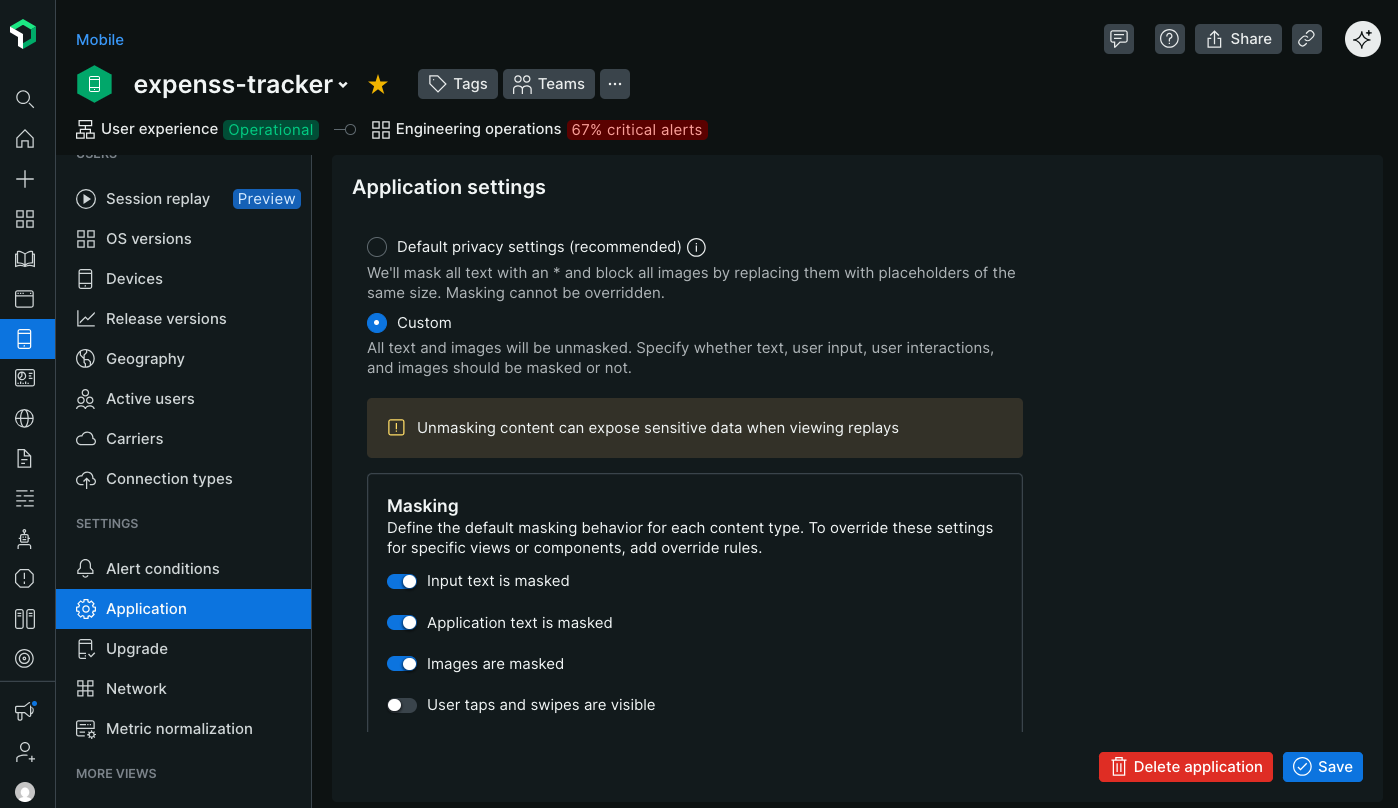
The four masking modes control different types of content:
#### Mask user input text [#mask-user-input]
Controls whether text entered by users into input fields is visible in replays.
**When enabled (recommended):**
- All characters typed by users are replaced with asterisks
- Example: User types "[john.doe@email.com](mailto:john.doe@email.com)" → appears as "********\*\*********" in replay
- Protects usernames, email addresses, search queries, form data, and other user-entered content
**When disabled:**
- User-entered text appears exactly as typed in the replay
- Use only when input fields contain non-sensitive information
- Helpful for debugging form validation issues or search functionality
> #### ⚠️ IMPORTANT
>
> Password fields are **always masked** regardless of this setting. SecureField (iOS), password input types (Android), and secure text entry fields will never show plaintext in replays.
**Default setting:** Enabled in the custom masking strategy.
**When you might disable this mode:**
- Public search bars where queries aren't personally identifiable
- Non-sensitive filters or category selections
- Debugging autocomplete or input validation issues
#### Mask application text [#mask-app-text]
Controls whether text displayed by your application (labels, buttons, headers, content) is visible in replays.
**When enabled:**
- All static and dynamic text rendered by your app is replaced with asterisks
- Example: "First Name:" label becomes "****\*\*\*****" in replay
- Protects any text that might contain or reveal sensitive information
**When disabled:**
- All application text appears exactly as users see it
- Labels, buttons, headings, and content are fully readable
- Makes replays much easier to understand and navigate
- Essential for identifying which screens or features users interacted with
**Default setting:** Enabled in the custom masking strategy.
**Recommendation for most apps:** Disable this mode unless displaying highly sensitive information. Visible UI text is crucial for:
- Understanding user navigation paths
- Identifying which buttons or features users clicked
- Seeing error messages that appeared
- Diagnosing layout or localization issues
- Correlating replays with specific app features
**Keep this mode enabled when:**
- Healthcare apps displaying patient information
- Financial apps showing account details or transactions
- Apps with user-generated content that might be sensitive
- Compliance requirements mandate masking all displayed text
> #### 💡 TIP
>
> If you disable this mode but need to mask specific sensitive text elements, use [override rules](#masking-overrides) to selectively mask only those components while keeping the rest of your UI visible.
#### Mask images [#mask-images]
> #### ⚠️ IMPORTANT
>
> Minimum agent versions that support image capture:
>
> - iOS agent v7.5.10 (released Sept 15, 2025)
> - Android agent v7.6.9 (released Sept 15, 2025)
> - React Native agent v1.5.10 (released Sept 15, 2025)
Controls whether images in your application are captured and displayed in replays.
**When enabled (recommended):**
- All images are replaced with placeholder blocks of the same size
- Placeholders preserve layout structure so you can see image positions
- No image data is transmitted to New Relic
- Protects user-uploaded photos, profile pictures, and potentially sensitive imagery
**When disabled:**
- Images are captured, compressed, base64 encoded, and included in the replay payload
- Images appear in replays, though at lower quality than users saw
- Significantly increases data transmission and storage costs
- Helps diagnose issues with image loading, rendering, or layout
> #### ⚠️ IMPORTANT CONSIDERATIONS WHEN CAPTURING IMAGES
>
> Enabling image capture significantly impacts data usage and performance:
>
> - **Data usage**: Images dramatically increase replay payload size, consuming substantially more user data and your New Relic storage quota
> - **Quality**: Images are aggressively compressed client-side to minimize impact, resulting in lower quality than original
> - **Performance**: Image capture and compression may impact app performance on older devices
> - **Privacy**: Consider whether images might contain sensitive or private information
>
> Only disable image masking when visual debugging is essential for your use case.
**Default setting:** Enabled in the custom masking strategy.
**When you might disable this mode:**
- Diagnosing image loading failures or rendering issues
- Investigating layout problems related to image dimensions
- Understanding user interactions with image galleries or media content
- Your app only displays public, non-sensitive images (icons, logos, illustrations)
**Keep this mode enabled when:**
- User profile pictures or uploaded photos
- Documents or screenshots captured within the app
- Medical imaging or healthcare-related imagery
- Any user-generated visual content
#### Hide user taps and swipes [#hide-interactions]
Controls whether user touch interactions are visualized in replays.
**When disabled (recommended):**
- User taps appear as green circles on the replay
- Swipe gestures appear as green lines showing the motion path
- Essential for understanding which UI elements users interacted with
- Helps identify usability issues, missed taps, or confusing interactions
**When enabled:**
- No tap or swipe visualizations appear in the replay
- Users appear to navigate through your app without any visible interaction
- Use when touch patterns could reveal sensitive information
> #### 💡 TIP
>
> The operating system keyboard and the taps and swipes on it are **never captured** in replays, regardless of this setting. This provides automatic protection for password entry and sensitive text input.
**Default setting:** Disabled in the custom masking strategy (taps and swipes are visible).
**When you might hide interactions:**
Masking text is generally sufficient, but hiding taps/swipes may be necessary when:
- Your app has an integrated PIN pad or numeric keypad where tap patterns reveal security codes
- Swipe patterns are used for authentication (pattern locks, gesture passwords)
- Touch interactions on specific screens could infer sensitive choices (medical symptom selection, financial decisions)
**Recommendation for most apps:** Keep interactions visible to:
- See exactly where users tapped, including missed or unresponsive areas
- Understand navigation patterns and user flow through your app
- Identify usability problems with small touch targets or unclear buttons
- Diagnose gesture-based features (swipe to delete, pull to refresh, etc.)
## Advanced masking configuration [#advanced-masking]
Use masking overrides when you want specific parts of your application to have different masking settings than your specified masking modes. For example, if the majority of your application doesn't have sensitive data, you can set your modes to unmask and specify overrides to only mask the parts of your application that contain sensitive data.
### Masking override methods [#masking-overrides]
We offer three ways to create masking override rules:
#### Inline attributes [#inline-attributes]
Inline masking overrides are applied in your code by tagging the component you want masked or unmasked. You'll need to deploy a new version of your app and have users adopt it for updates to apply, so they are best used when you want the oversight of your change control process to manage masking changes.
##### iOS
**SwiftUI**
Use `NRConditionalMaskView` to wrap content that should have specific masking behavior. This SwiftUI component provides fine-grained control over data masking in session replay.
**Requirements:**
- iOS 16.0+
- Swift 5.0+
**Import:**
```swift
import SwiftUI
import NewRelic
```
**Basic usage:**
```swift
// Mask all text content within this view
NRConditionalMaskView(maskApplicationText: true) {
VStack {
Text("This text will be masked in session replay")
Text("This text will also be masked")
}
}
```
**Unmask content:**
```swift
// Explicitly unmask content (useful when parent views have masking enabled)
NRConditionalMaskView(maskApplicationText: false) {
Text("This text will be visible in session replay")
}
```
**Identifier-based masking:**
```swift
// Use an identifier to control masking via API or dashboard settings
NRConditionalMaskView(sessionReplayIdentifier: "unmasked-section") {
Text("This text masking is controlled by the identifier")
}
```
Use `NRConditionalMaskView` to wrap content. You can use the `blockView` parameter to completely obscure a view hierarchy.
**SwiftUI**
```swift
// Block all content within this view (renders as a black rectangle)
NRConditionalMaskView(blockView: true) {
YourSensitiveView()
}
```
> #### 💡 TROUBLESHOOTING MISSING TEXT IN SWIFTUI
>
> If there's ever an instance where text is missing from the replay, wrap the entire screen region in an `NRConditionalMaskView` without parameters to fix the issue:
>
> ```swift
> NRConditionalMaskView {
> // Your entire screen region content here
> YourScreenView()
> }
> ```
**UIKit**
You can block views using the `blockView` property directly or by using a specific accessibility identifier.
**Using the property:**
```swift
let sensitiveView = UIView()
sensitiveView.blockView = true
```
**Using accessibility identifier:**
Adding `nr-block` to the identifier will trigger the blocking behavior.
```swift
let sensitiveView = UIView()
sensitiveView.accessibilityIdentifier = "nr-block"
```
**Parameters:**
- `maskApplicationText`: When `true`, masks all text content within the view. When `false`, ensures text is visible. When `nil`, inherits from parent.
- `maskUserInputText`: When `true`, masks user input fields within the view. When `false`, shows input content. When `nil`, inherits from parent.
- `maskAllImages`: When `true`, masks all images within the view. When `false`, shows images. When `nil`, inherits from parent.
- `maskAllUserTouches`: When `true`, masks user touch interactions within the view. When `false`, shows touch events. When `nil`, inherits from parent.
- `sessionReplayIdentifier`: Optional identifier to control masking via `addSessionReplayMaskedAccessibilityIdentifier`, `addSessionReplayUnmaskedAccessibilityIdentifier`, or through the New Relic application dashboard.
- `blockView`: When `true`, the entire view area is obscured in the session replay. When `false`, there's no blocking behavior.
- `activated`: When `false`, disables masking functionality entirely for this view. Default is `true`.
**Advanced example - Mixed masking in a form:**
```swift
struct RegistrationForm: View {
@State private var firstName = ""
@State private var email = ""
@State private var password = ""
var body: some View {
VStack(alignment: .leading, spacing: 16) {
// Public form labels remain visible
NRConditionalMaskView(maskApplicationText: false) {
Text("Create Your Account")
.font(.title)
}
// Personal information
NRConditionalMaskView(sessionReplayIdentifier: "personal-info") {
TextField("First Name", text: $firstName)
TextField("Email", text: $email)
}
// Highly sensitive - mask everything
NRConditionalMaskView(sessionReplayIdentifier: "password-section") {
SecureField("Password", text: $password)
Text("Password must be at least 8 characters")
}
Button("Sign Up") {
// Handle registration
}
}
.padding()
}
}
```
**UIKit**
Add or append `nr-mask` or `nr-unmask` to the `accessibilityIdentifier` of the `UIView` to be masked or unmasked. Appending an existing identifier is helpful if you need to maintain unique identifiers for automated testing, but you will likely need to update your tests after changing the values.
Example of adding an `accessibilityIdentifier`:
```swift
let myView = UIView()
myView.accessibilityIdentifier = "nr-mask"
```
Example of appending to an existing `accessibilityIdentifier`:
```swift
let myView = UIView()
myView.accessibilityIdentifier = "someExistingId.nr-unmask"
```
##### Android
**Jetpack Compose**
Use Modifier extensions to control masking and blocking behavior in Jetpack Compose.
Example:
````kotlin
// Mask a composable
Text(
text = "Sensitive information",
modifier = Modifier.newRelicMask()
)
// Unmask a composable
Text(
text = "Public information",
modifier = Modifier.newRelicUnmask()
)
// Block a composable
Text(
text = "Sensitive User information",
modifier = Modifier.newRelicBlock()
)
```
**XML layouts**
Add an `nr-mask`,`nr-unmask` or `nr-block` tag to the views or components to be masked, unmasked or blocked.
Example:
```xml
```
````
##### React Native
Use the `` and `` components to mask or unmask views or components.
Example:
````jsx
Sensitive information
Non-sensitive information
```
````
#### Local API methods [#local-api]
Local API method masking overrides are also applied in your code within the New Relic agent configuration. They are useful when the targeted views already have unique identifiers and you want to manage them in a centralized list instead of tagging each view individually throughout your code.
##### iOS
**SwiftUI**
For SwiftUI views, use the `sessionReplayIdentifier` parameter in `NRConditionalMaskView` along with these methods:
- `addSessionReplayMaskedAccessibilityIdentifier`
- `addSessionReplayUnmaskedAccessibilityIdentifier`
Example:
```swift
// In your app initialization
NewRelic.addSessionReplayMaskedAccessibilityIdentifier("sensitive-section")
NewRelic.addSessionReplayUnmaskedAccessibilityIdentifier("public-section")
// In your SwiftUI views
NRConditionalMaskView(sessionReplayIdentifier: "sensitive-section") {
Text("This will be masked")
}
NRConditionalMaskView(sessionReplayIdentifier: "public-section") {
Text("This will be visible")
}
```
**UIKit**
Mask or unmask views by adding their `class` or `accessibilityIdentifier` to the following methods:
- `addSessionReplayMaskViewClass`
- `addSessionReplayUnmaskViewClass`
- `addSessionReplayMaskViewAccessibilityIdentifier`
- `addSessionReplayUnmaskViewAccessibilityIdentifier`
Example:
```swift
NewRelic.addSessionReplayMaskViewClass("SecureLabel")
NewRelic.addSessionReplayUnmaskViewClass("UnsecureLabel")
NewRelic.addSessionReplayMaskViewAccessibilityIdentifier("login")
NewRelic.addSessionReplayUnmaskViewAccessibilityIdentifier("editTextEmail")
```
##### Android
**Jetpack Compose**
Use Modifier extensions to control masking and blocking behavior in Jetpack Compose.
Example:
````kotlin
// Mask a composable
Text(
text = "Sensitive information",
modifier = Modifier.newRelicMask()
)
// Unmask a composable
Text(
text = "Public information",
modifier = Modifier.newRelicUnmask()
)
// Block a composable
Text(
text = "Sensitive User information",
modifier = Modifier.newRelicBlock()
)
```
**XML layouts**
Mask or unmask views by adding their `class` or `android:tag` to the following methods:
- `addSessionReplayMaskViewClass`
- `addSessionReplayUnmaskViewClass`
- `addSessionReplayMaskViewTag`
- `addSessionReplayUnmaskViewTag`
Example:
```java
NewRelic.addSessionReplayMaskViewTag("login");
NewRelic.addSessionReplayUnmaskViewTag("editTextEmail");
NewRelic.addSessionReplayUnmaskViewClass("android.widget.Button");
NewRelic.addSessionReplayMaskViewClass("android.widget.TextView");
NewRelic.addSessionReplayMaskViewClass("com.yourpackagename.CustomView");
```
````
#### Server-side rules [#server-side-rules]
> #### ⚠️ IMPORTANT
>
> Minimum agent versions that support server-side rules:
>
> - iOS agent v7.5.10 (released Sept 15, 2025)
> - Android agent v7.6.9 (released Sept 15, 2025)
> - React Native agent v1.5.10 (released Sept 15, 2025)
Server-side masking rules allow you to retroactively patch masking mistakes in app versions that have already been released. They take immediate effect on all new session starts without requiring an app update.
Rules consist of three components:
- **Type**: Determines whether matching components should be masked or unmasked
- **Identifier**: Specifies how you want to target elements (e.g., by class, tag, etc.)
- **Value**: The value of the selected identifier the rule will apply to
For example, a rule to `Mask` `class` `android.widget.EditText` would mask all user-editable text fields in an Android app.
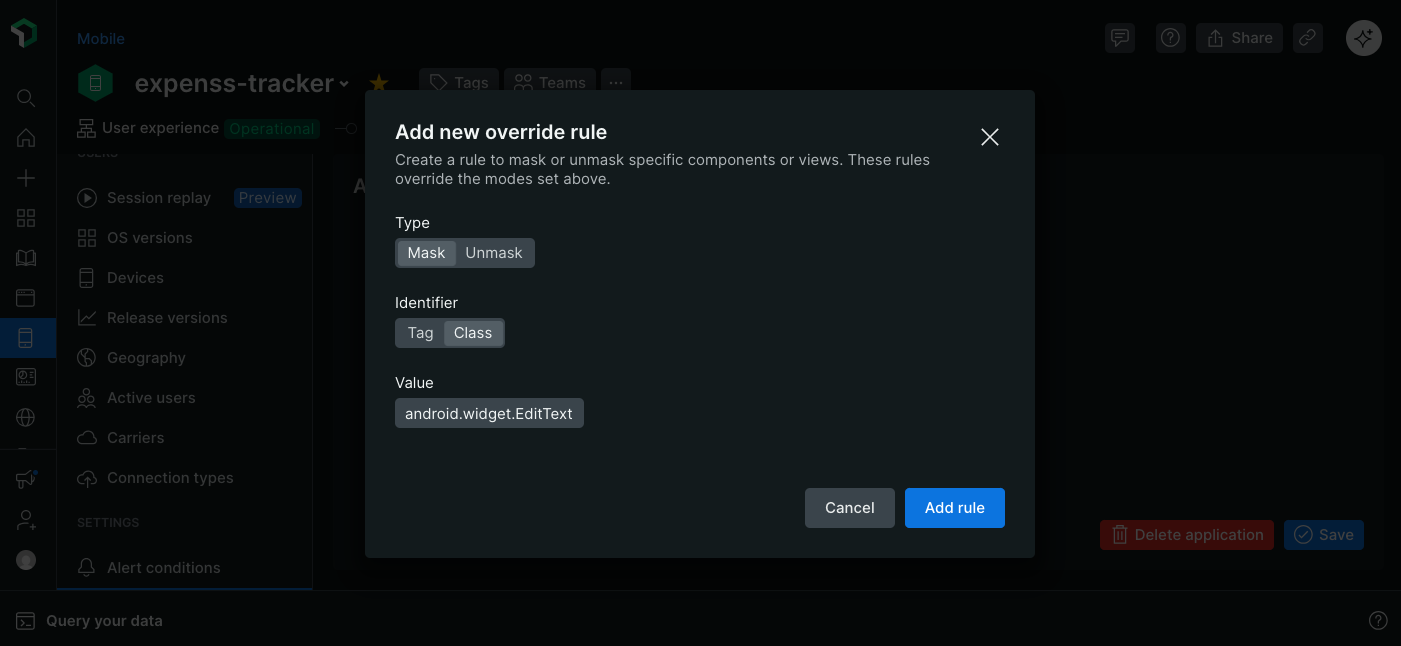
Define masking overrides for Mobile Session Replay in application settings.
**To create a new rule:**
In the New Relic web interface:
1. Go to **Mobile > [your entity] > Settings > Application > Session Replay**.
2. Scroll to **Override rules** and click **Add new override rule**.
3. Select the rule type (Mask or Unmask).
4. Choose the identifier you want to use to target components.
5. Input the value of the identifier you want the rule to apply to.
6. Click **Add rule**.
The new rule is added to the Override Rules table and will be enforced on all new sessions.
**To delete or edit a rule:**
In the New Relic web interface:
1. Navigate to **Mobile > [your entity] > Settings > Application > Session Replay**.
2. Locate the rule you want to modify in the Override Rules table.
3. Click the `...` menu, then select **Delete** or **Edit**.
### Masking rule priority [#priority]
When several masking rules apply to one view or element, the following priority order determines which rule is applied:
1. **Strategy supersedes everything**
If your masking strategy is `Default`, modes and overrides are not enforced.
_Example:_ If you have added inline `nr-unmask` attribute overrides in your code but the `Default` masking strategy is selected in settings, everything will still be masked.
2. **Overrides supersede modes**
Modes determine the standard behavior when an override isn't present, so if an override is present, it will always take precedence over the mode.
_Example:_ If `Mask application text` mode is enabled and you add an inline `nr-unmask` attribute override to a view in your code, that view will be unmasked but every other view will be masked.
3. **Masking overrides supersede unmasking overrides**
If a single view has both masking and unmasking overrides, it will always be masked.
_Example:_ If a view has an inline `nr-unmask` attribute override and an `nr-mask` server-side rule, the view will be masked.
4. **Parent / child priority rules**
Note that if here are conflicting rules, a parent’s masking takes priority over subtree rules.
_Example:_ If a parent has `nr-block` attribute but a child has `nr-unmask`, the entire subtree is replaced with the black rectangle placeholder blocking content; no children content in subtree is captured.
**Next:** [View session replays in New Relic](https://docs.newrelic.com/docs/mobile-monitoring/mobile-monitoring-ui/mobile-session-replay/view-session-replays)